Selections in Adobe Photoshop: In this step by step guide you will learn 3 Easy and Quick Selection tools to Make Precise Selections in Photoshop

Do you want to make quick selections in Photoshop?
Are you looking for how to make precise selections in Photoshop?
Then, you are in the right place.
Because in this article, I will share with you How to use three amazing photoshop tools to make precise selections quickly. I always use these tools to make quick selections in my post-processing workflow. These three selection tools will be useful to you for making quick selections in Adobe Photoshop.
And the best part is?
These selection tools are easy to use. And the results you will get are accurate. No matter if you are a Product, Portrait, Travel, Landscape, or Wildlife Photographer, you can use these selection tools in Photoshop.
Let’s Dive right in-.
In this article, you will learn about the following selection tools –
1. Color Range Based Selection
If you want to optimize the specific colors in your images, Color Range-based Selection will be useful to you.
Color Range Based selection helps you to make precise selections based on Specific Colors.
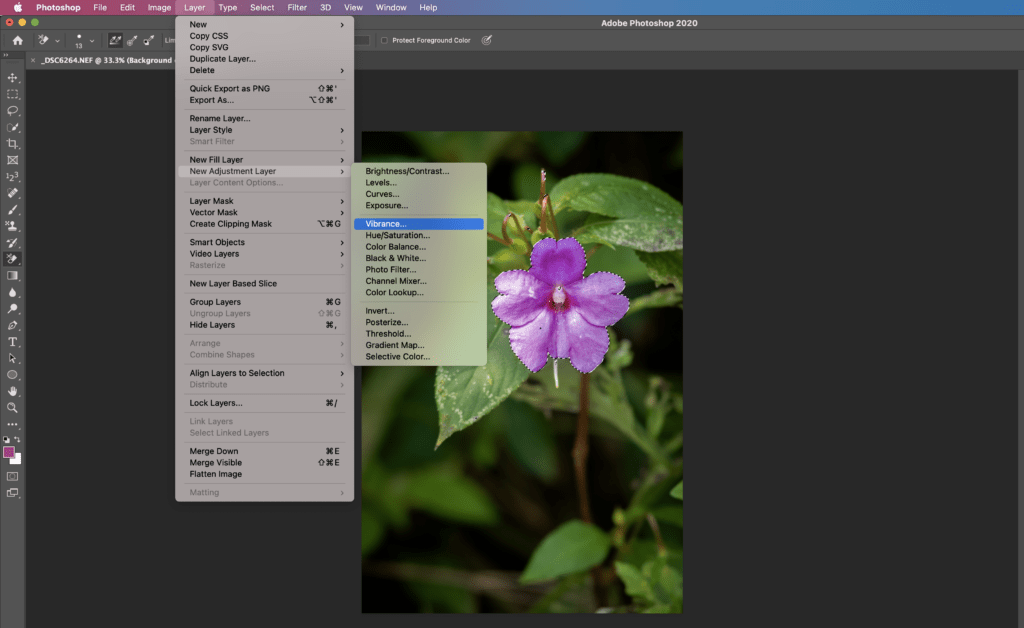
In this beautiful image of Impatiens flower, I wanted to make color adjustments to the Flower. Hence I can make precise Selection based on the color of the Flower.
- Create a Background Copy Layer by Selecting the background layer and dragging at Create New Layer Icon ( + symbol)
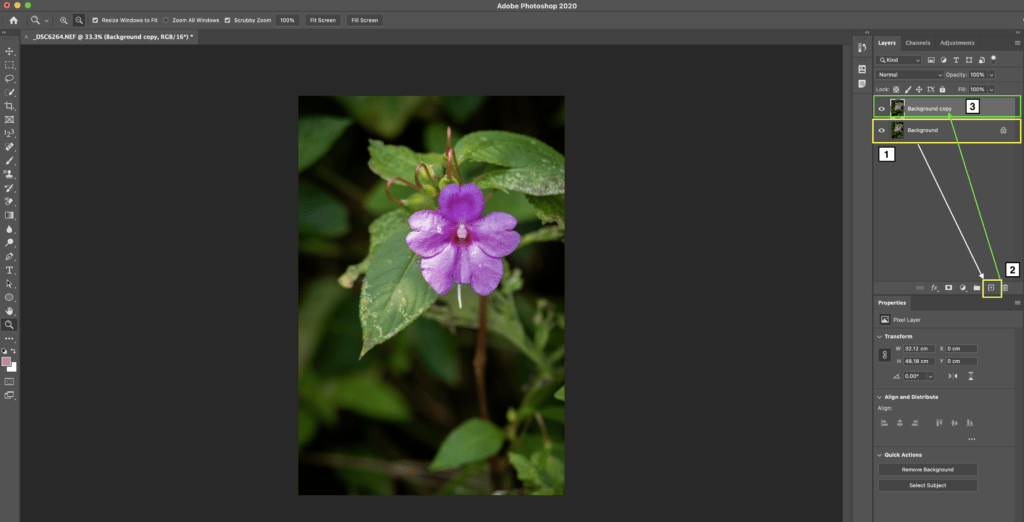
- While Background copy Layer is selected, click > Select > Color Range.
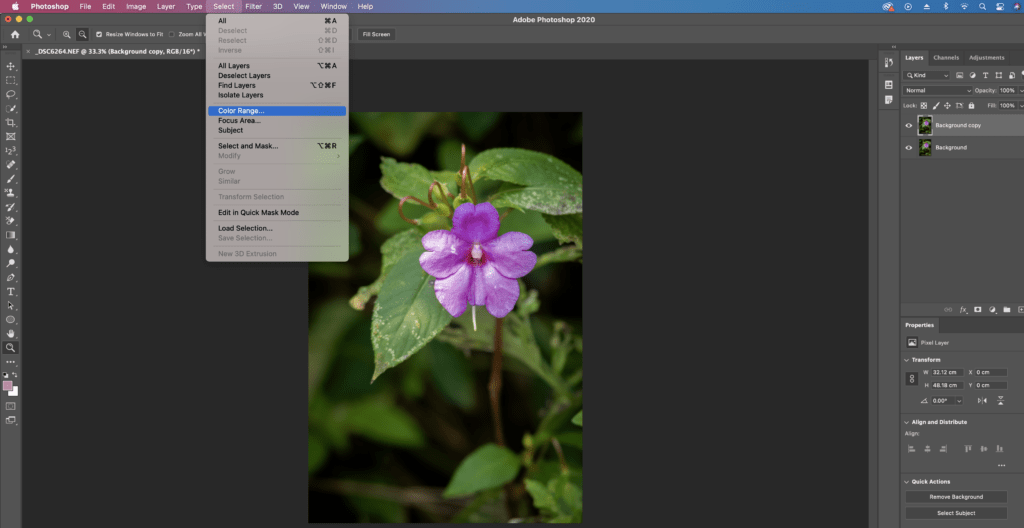
- Color Range Window will pop-up
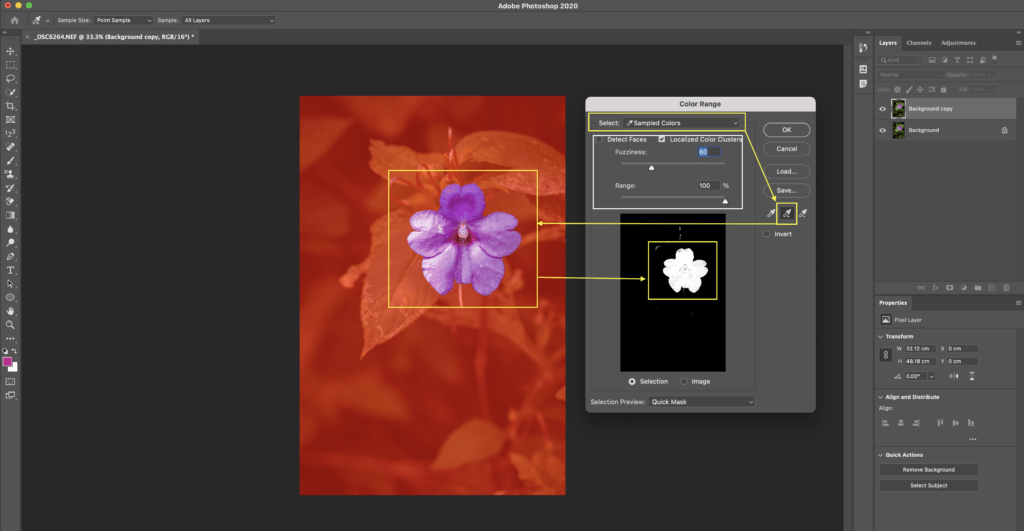
- Select Sampled Colors.
- Select the Eyedropper tool and click the color which you want to select.
- Then click on Add to Sample, and click on different areas of Flower. In this step, you are selecting the color range.
- Now Uncheck the option > Detect Faces and Check the Option > Localized Color Clusters. Since we want to make a precise selection of the Flower, hence Localized Color Clusters option is checked.
- Fuzziness controls the selection area outside of your initial Selection. Adjust Fuzziness by previewing the image. For precise color selection, try to keep Fuzziness to lower values.
- With the Range slider, you can adjust the Range of Selection.
- Under the preview window, you can see the Selection made. The White-colored area is the selected area. Click Ok.
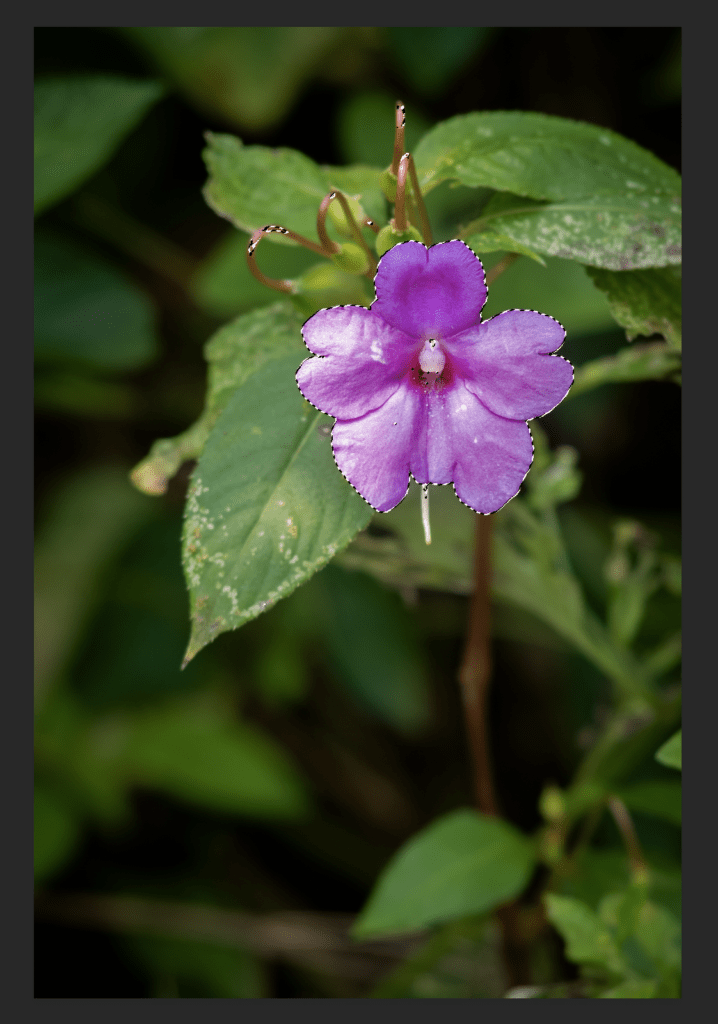
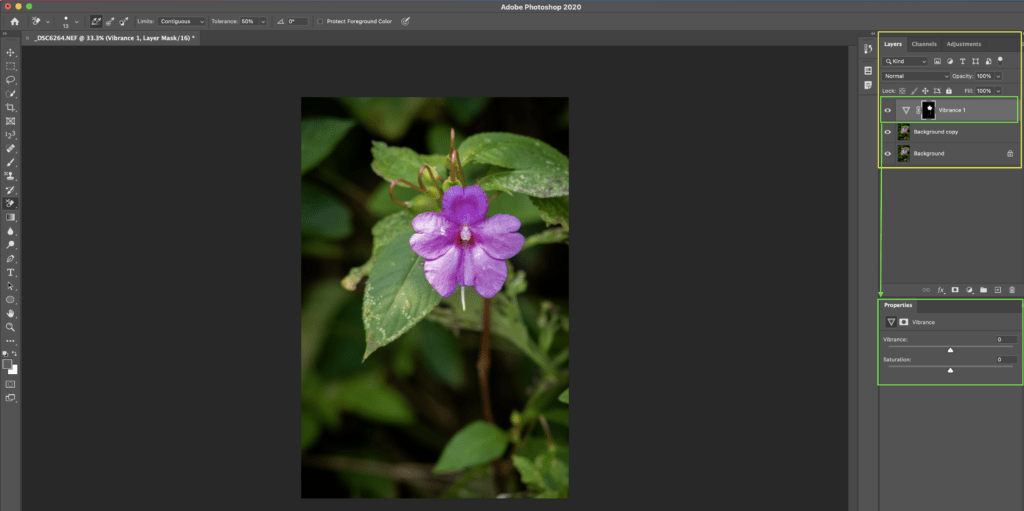
- While you have made the color-based Selection, Click on Layer > New Adjustment Layer > Select the adjustment layer you want to apply, such as Vibrance, Brightness/Contrast, and Hue/Saturation, etc.
2. Focus Area-based Selection
Now, let’s learn how to make selections based on the Focus area. Focus area-based selection option is useful when you are perfectly focussed object and out of focus background.
This option works extremely well with the images, which have a clear distinction between the main object and background.
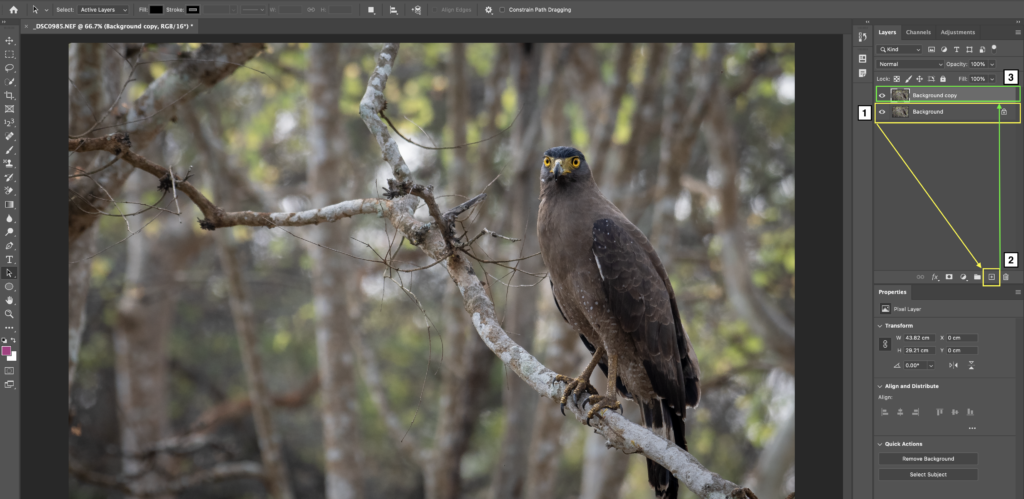
For demonstration purposes, we have a magnificent Serpent Eagle with Intense eyes. This Eagle was perched on a dried tree. The Eagle is in Focus, and the background is out of Focus.
If you have to apply selective adjustments such as Sharpening, Brightness/Contrast, or Black/White point adjustment, you can create selections based on Focus Area.
Here are steps to make Focus Area-based selections.
- Create a Background Copy Layer by Selecting the background layer and dragging at Create New Layer Icon ( + symbol)
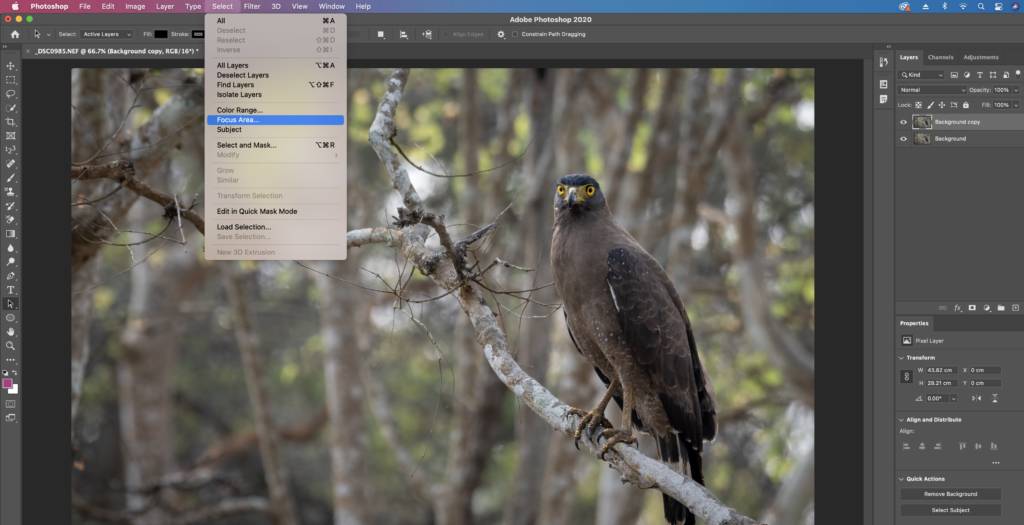
- While Background copy Layer is selected, click > Select > Focus Area. Focus Area Window will pop-up
- Select the View Mode, which is convenient for you. I generally prefer the Marching Ants or Overlay View Mode Option.
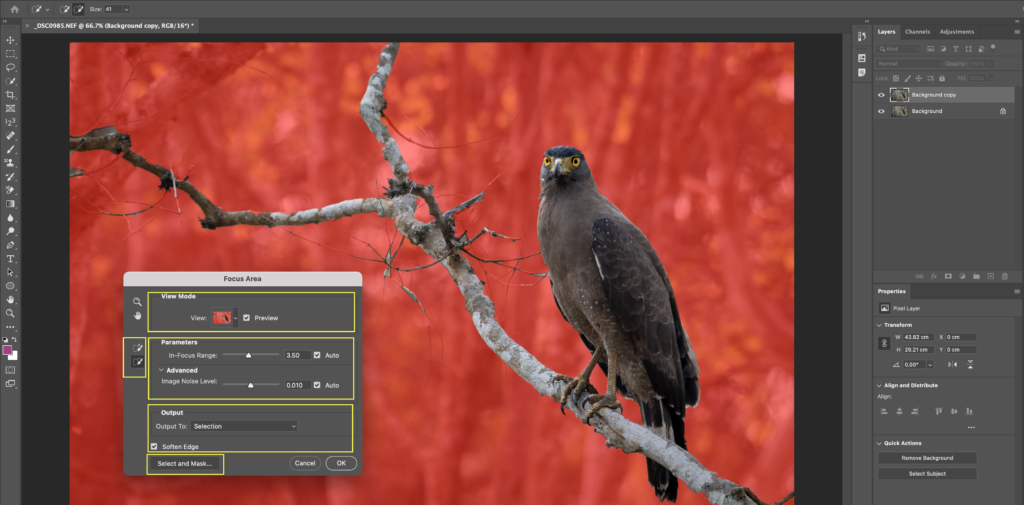
- Under Parameter’s option: In-Focus Range first check the Auto box. The software will make Auto Selection. Then if required, you can manually adjust the In-Focus Range. For Image Noise Level, you can select an Auto option.
- On the left side of the Pop-up window, there are two options – 1. Focus Area add tool and 2. Focus Area Subtract tool. You can add the Focus area or remove the selected area using these two tools. Focus area Add and Subtract tool to fine-tune your Selection.
- Now, let’s see how you can use this Selection. There is an option under the Output tab: Output To. There are multiple options such as Selection, Layer Mask, New Layer, etc. I generally choose Output to Selection or New Layer with Layer Mask.
- Select the Soften edge check box. Then click on the ‘Select and Mask’ button. Select and Mask option will help you to further Fine Tune the Selection. In the Select and Mask window, fine-tune the Selection and click Ok.
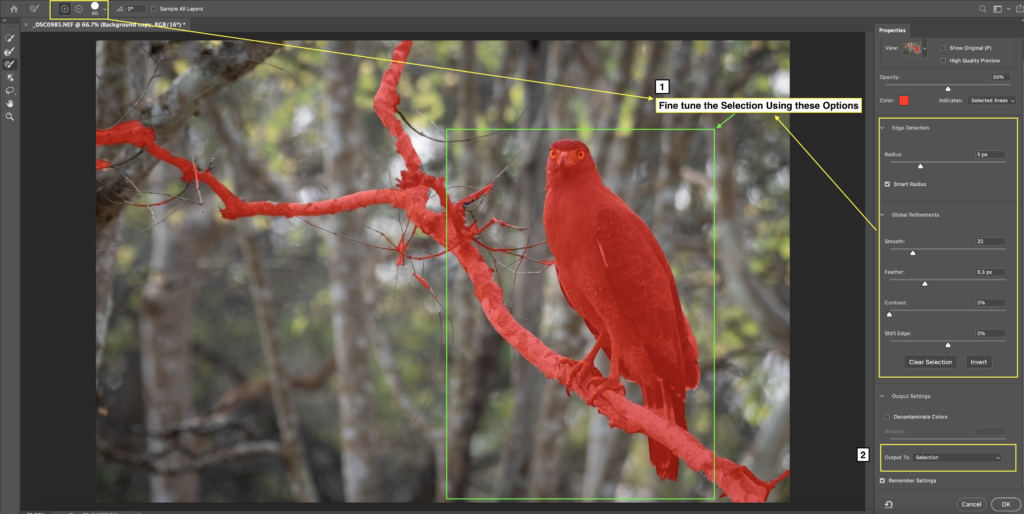
- The Selection will be made, and the New Layer with Layer mask is created, or a Selection is created depending on which output format you choose.
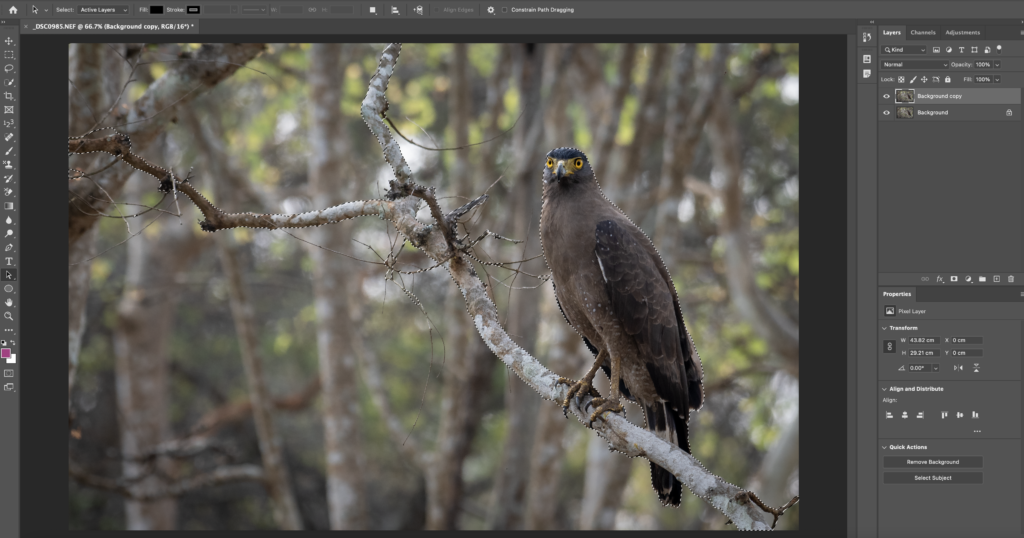
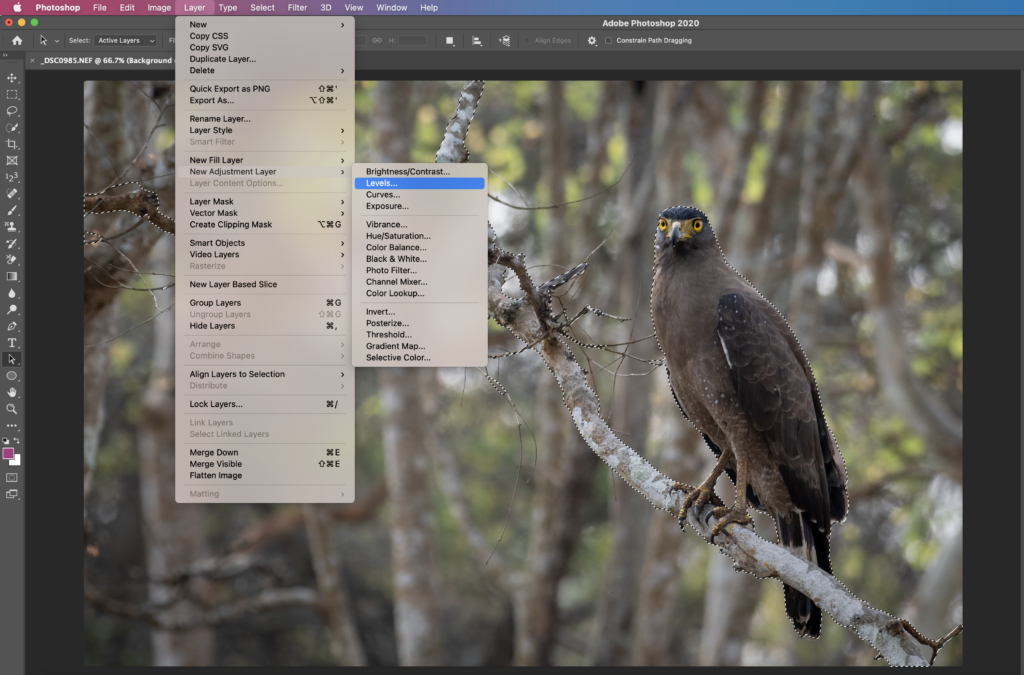
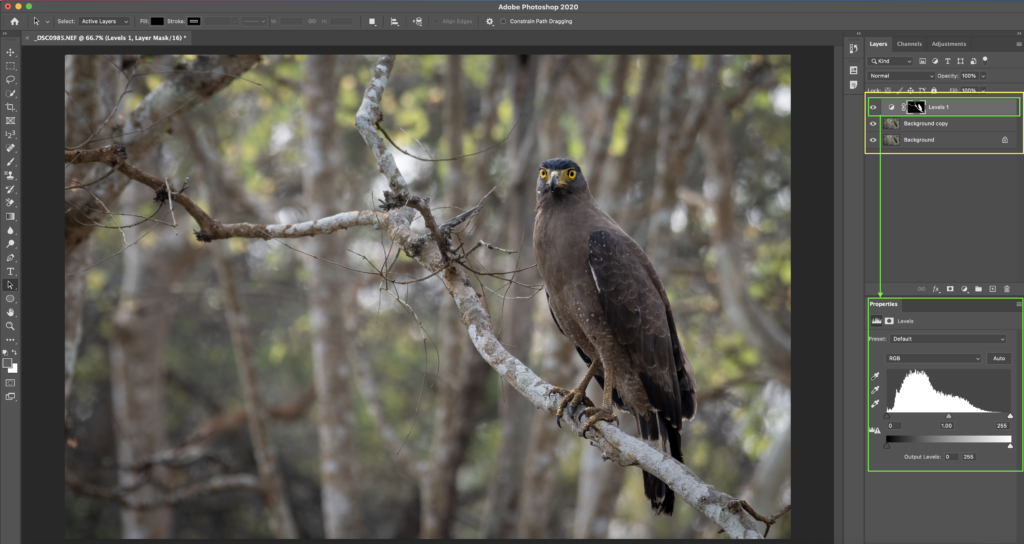
- Now, you can make Targeted Color / Tonality Adjustments using the Adjustment Layer option.
Now let’s learn how to make Subject-based Selections.
3. Subject-based Selection
In the Subject-based selections, the Subject ( Which is in Focus) is detected and selected. However, if there are many under Focus areas, then Subject-based Selection may not make selections accurately.
On the other hand, if there is a decent focus distinction between the main Subject and surrounding, then Subject-based Selection can be helpful.
Here are the steps which you can follow to make Subject Based Selections
- Create a Background Copy Layer by Selecting the background layer and dragging at Create New Layer Icon ( + symbol)
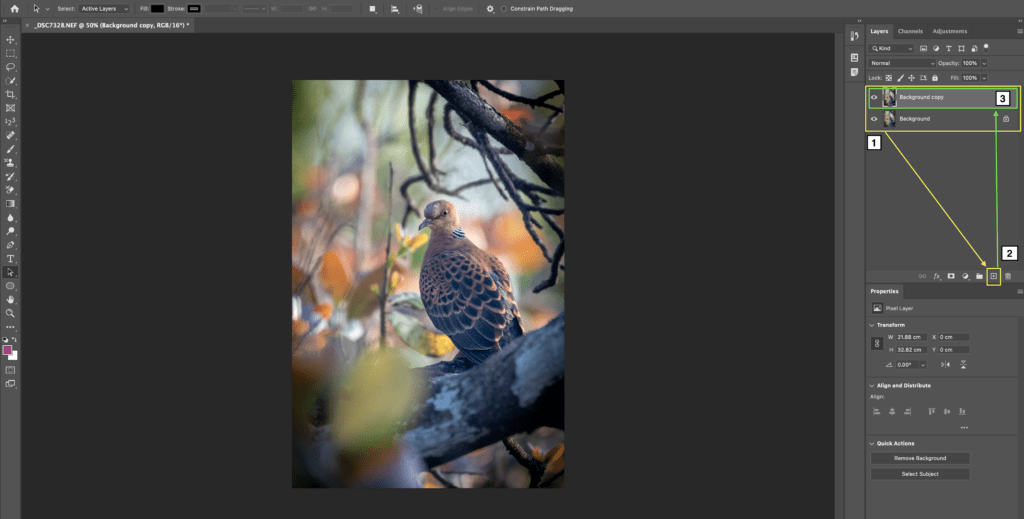
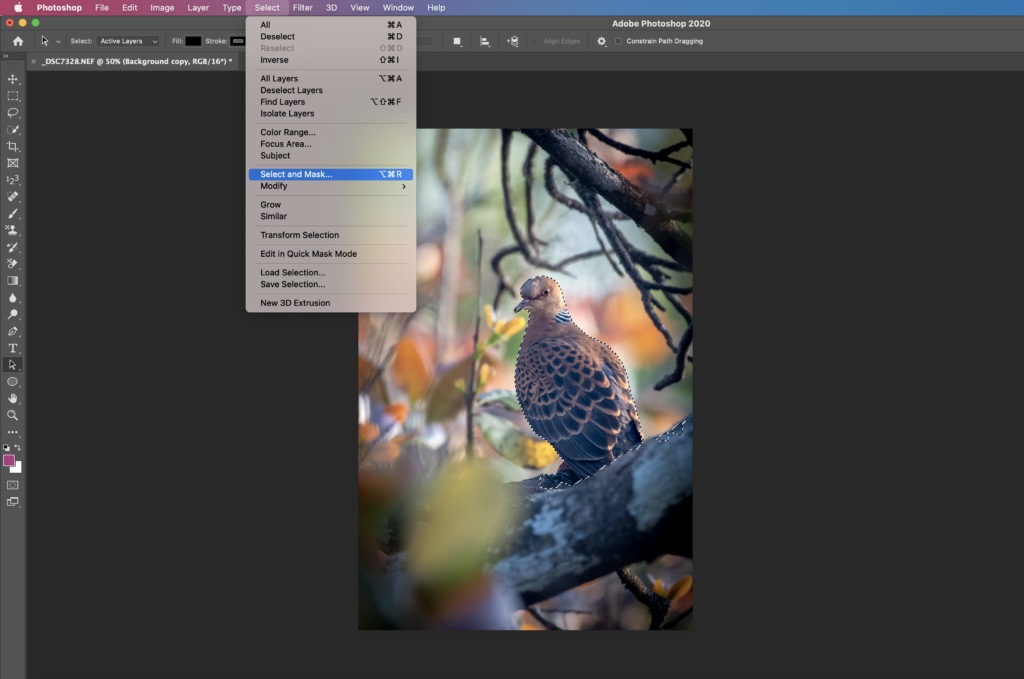
- While Background copy Layer is selected, click > Select > Subject.
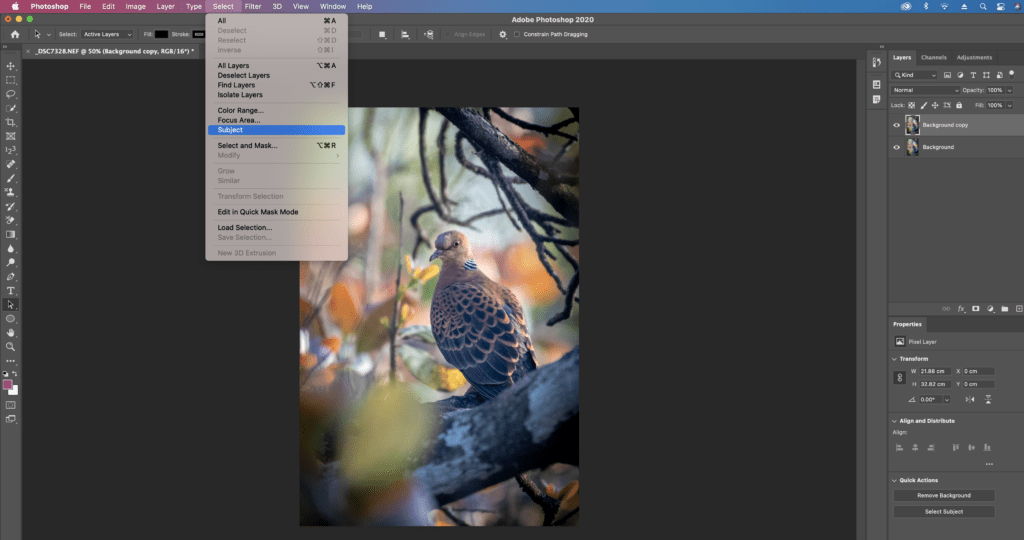
- You will see an automatic selection made.
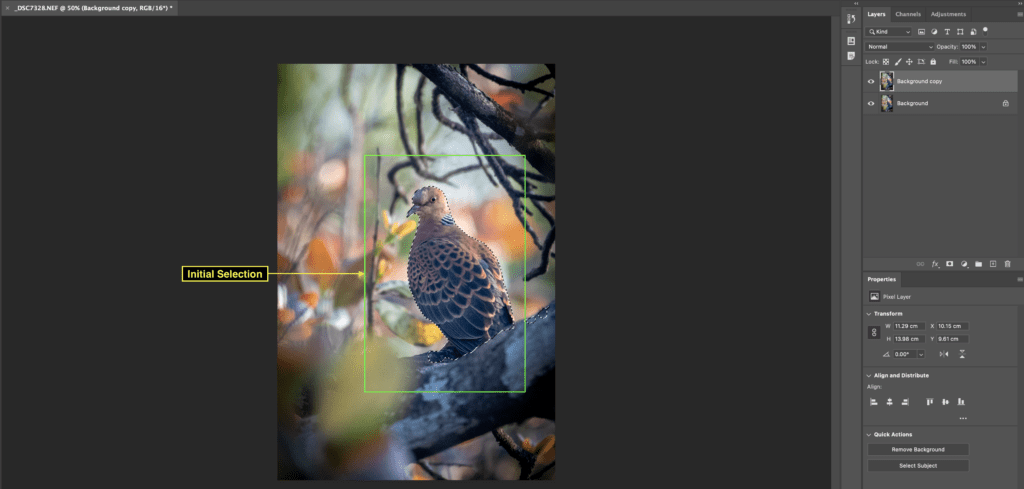
- Initial Selection is made; now, Click on Select > Select and Mask.
- Select and Mask window will pop-up; now refine your selections.
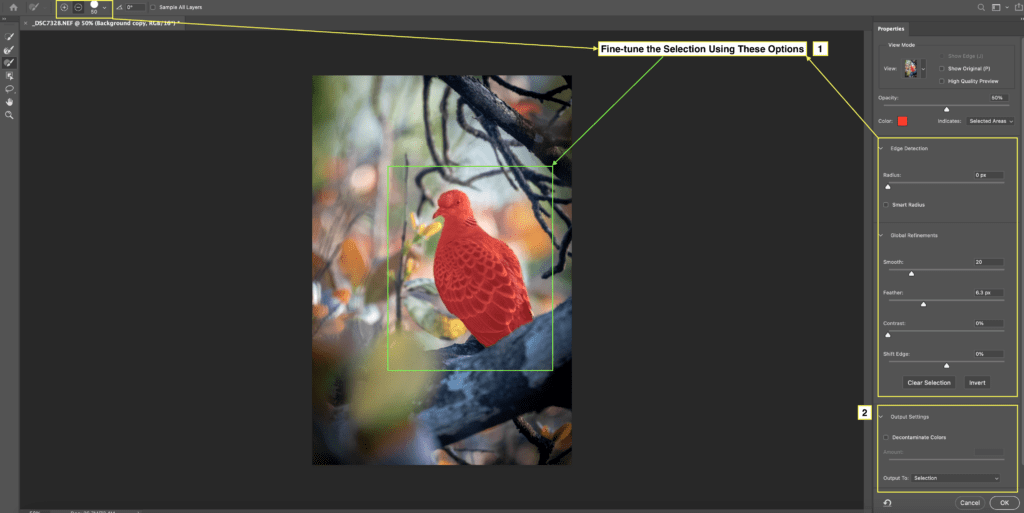
- Under the Output Settings, > Output Settings > Select options from the Drop Down.
- Select either of the option: Selection or New Layer with Layer Mask.
- Now the Selection will be made. The New Layer with Layer mask is created, or a Selection is created depending on which output format you choose.
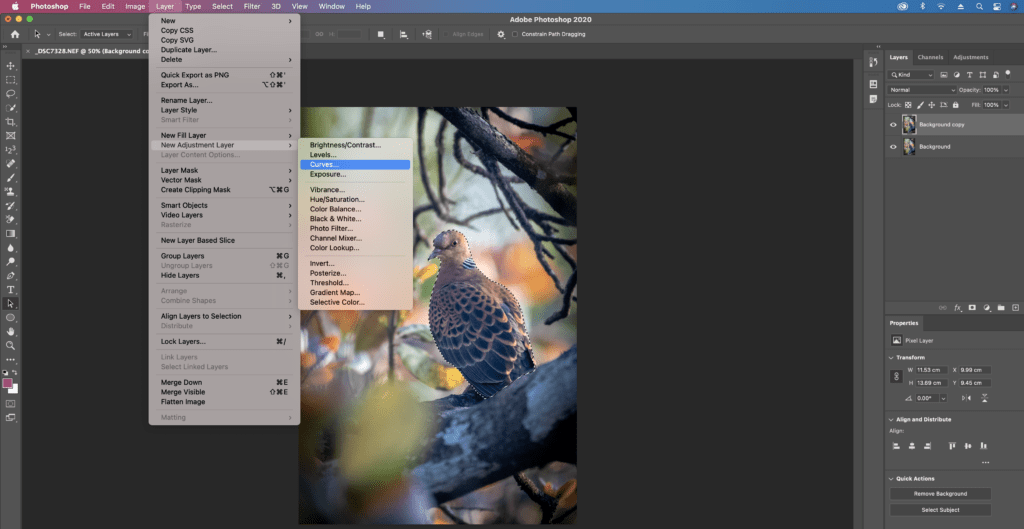
- Now you can make Targeted Color / Tonality Adjustments using the Adjustment Layer option.
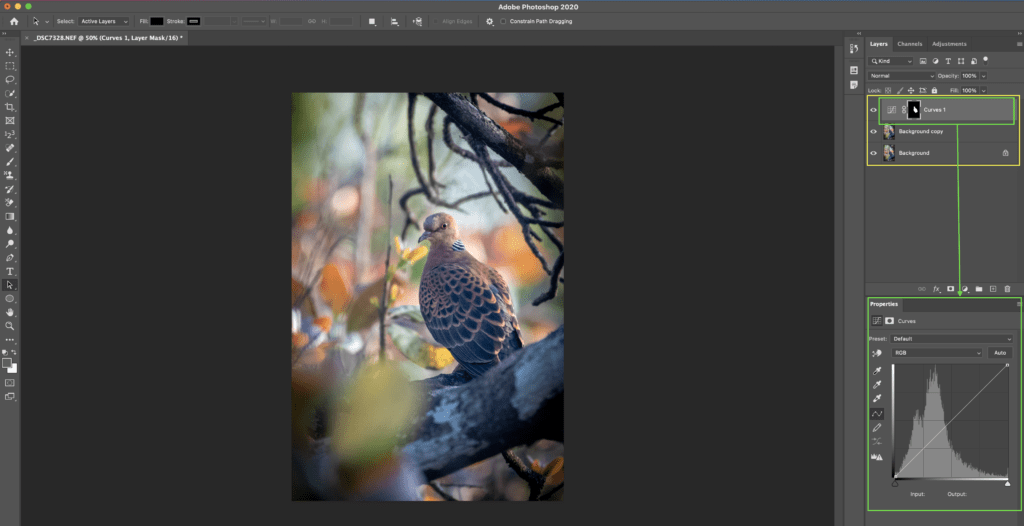
These are the quick selection techniques you can use in Adobe Photoshop.
I recommend you can start with Color-based Selection or Focus Based Selections.
Now it’s your turn!
I hope you enjoyed these tips on the Selections in Adobe Photoshop.
Which of the Techniques you are going to try first.
Let me know by leaving the comment below right now.
EXPLORE. PHOTOGRAPH. INSPIRE
JOIN OUR NEWSLETTER AND GET THE BEST ARTICLES ABOUT DIGITAL POST-PROCESSING AND PHOTOGRAPHY TECHNIQUES. NO CHARGE. NO SPAM. ONLY LOVE.
Leave a Reply