This is beginners guide on How to import images in Adobe Lightroom. You will learn about how to create a Catalog and how to Import images effectively in Adobe Lightroom.

Want to Import images in Adobe Lightroom?
Then you are in the right place.
Because today I am going to show you the exact Image Importing tips in Adobe Lightroom. These tips I use to import the images in Adobe Lightroom effectively.
And the best part is?
All of these proven techniques are working great in Adobe Lightroom Classic 2020 and earlier versions as well.
Let’s dive right in!
Adobe Lightroom Import techniques you will learn in this post.
- Creating new Catalog in Adobe Lightroom
- Import images in the Library Module
- Select a Source
- Import settings
- Select a destination
- File Handling and develop settings during the import
Creating new Catalog in an Adobe Lightroom
What is Adobe Lightroom Catalog?
Consider Catalog in the Adobe Lightroom is a Digital Diary of your images. Metadata, Edits, Ratings, Keywords, or any information related to the Image is stored in the Catalog. It is a database of the image information.
Here are the steps to create Catalog in Adobe Lightroom
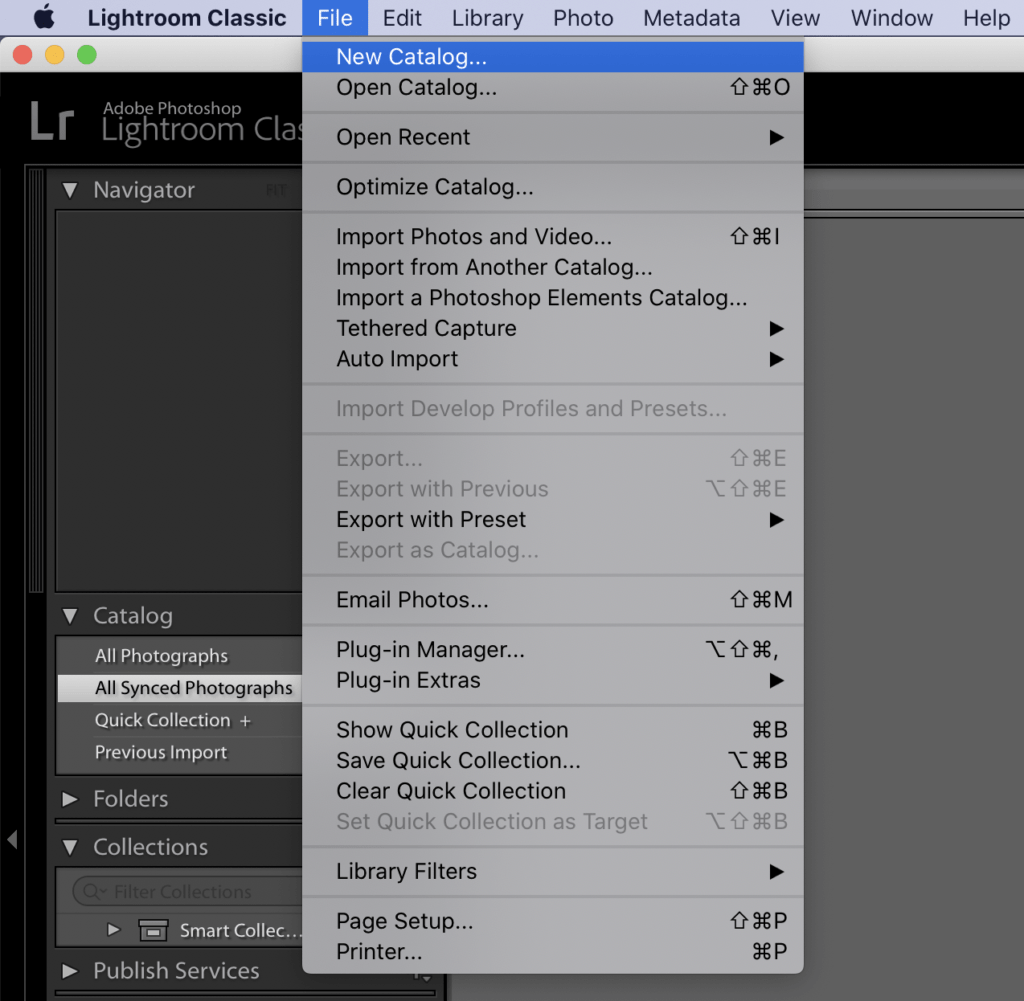
- Select File > New Catalog
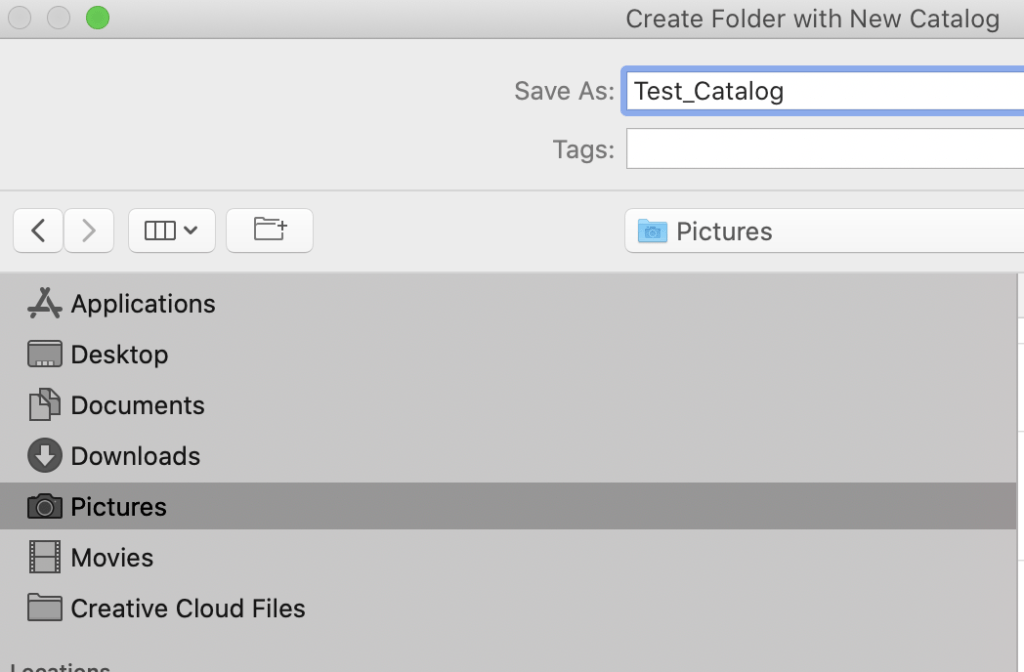
- In the window Create Folder with New Catalog
Save as: Enter the Catalog Name
Where: Specify the Catalog Location
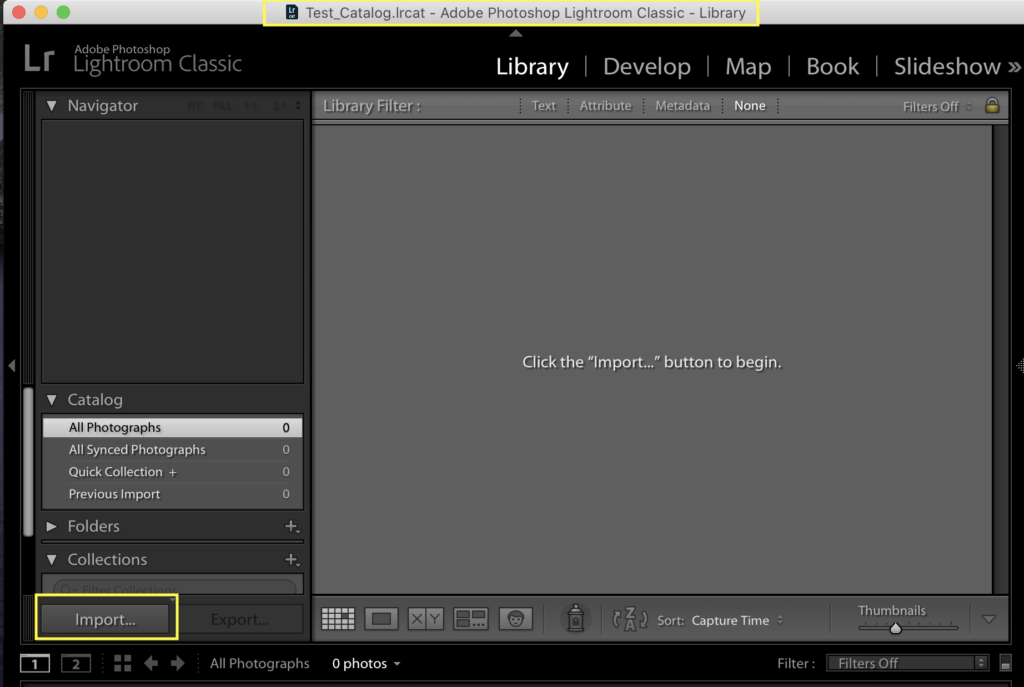
- The New Catalog file will get open. Check the Catalog file name at the top of the window.
Import images in the Library Module
Select the Source
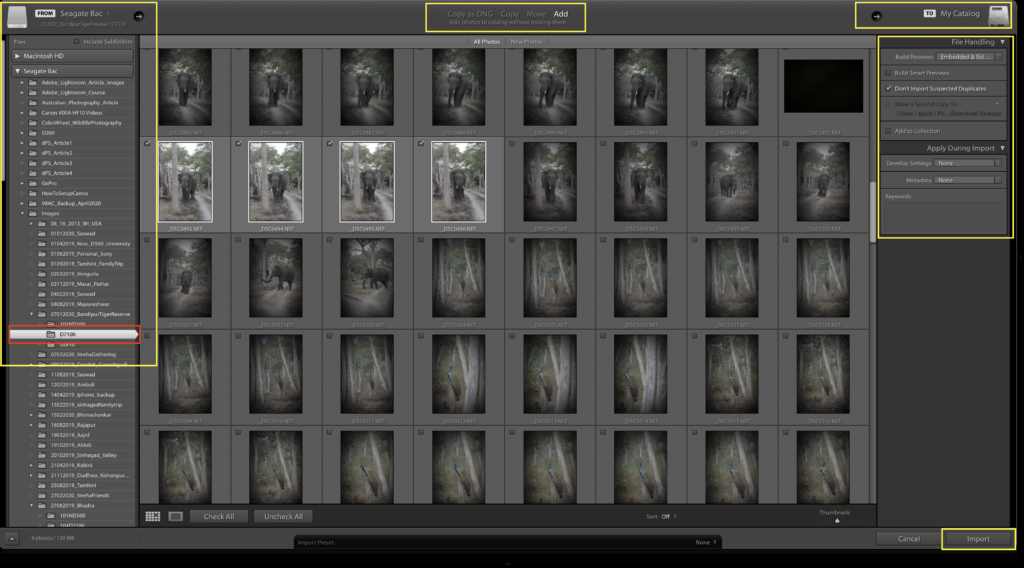
- Click on the ‘Import’ button. Import Window will open.
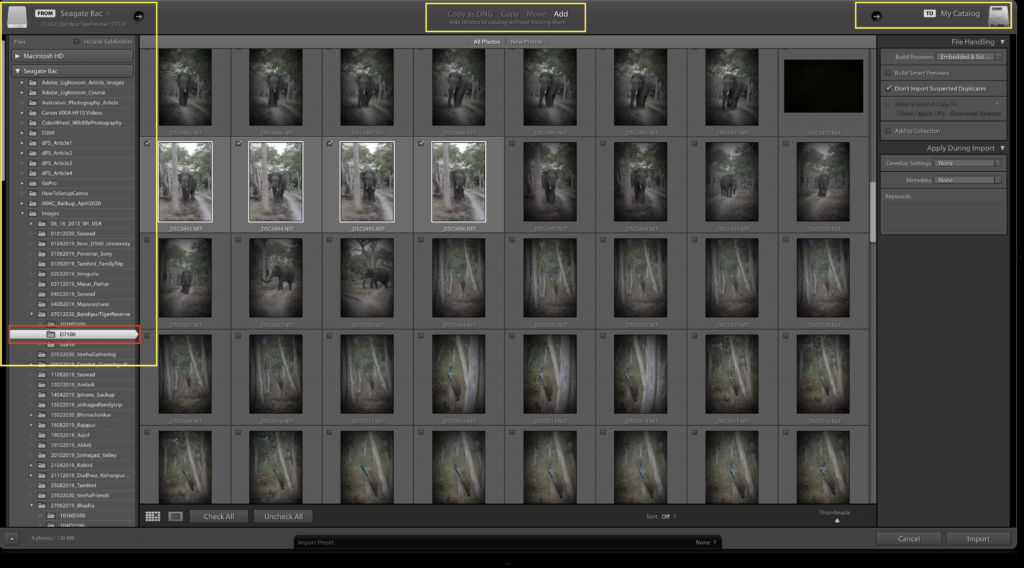
- Click on the ‘Select a Source.’ Specify the Source from which images needs to imported
- Select the Source by browsing or select the Source by choosing the folder under Source> Files > ‘Select the Image folder.’
Import Setting
You can import Image in 4 ways.

- Copy as DNG: Image will be converted to DNG format. The DNG image will be copied.
- Copy: Image will be copied as it is to the Catalog
- Move: Image will be moved from the original location to the Catalog
- Add: Image will be located at its original position only and will not be moved or copied from its original location
If your Image is located in the external hard drive or computer hard drive, you should select the Add option. You will save space by doing so.
If your images are located in a memory card or camera, then use the option Copy. Hence the pictures from memory card or camera will be copied.
However, I recommend – First, you copy the images to a hard drive and then import them in Lightroom using the ‘Add’ option.
Images will be added to MyCatalog ( Or the Catalog Name )
File Handling
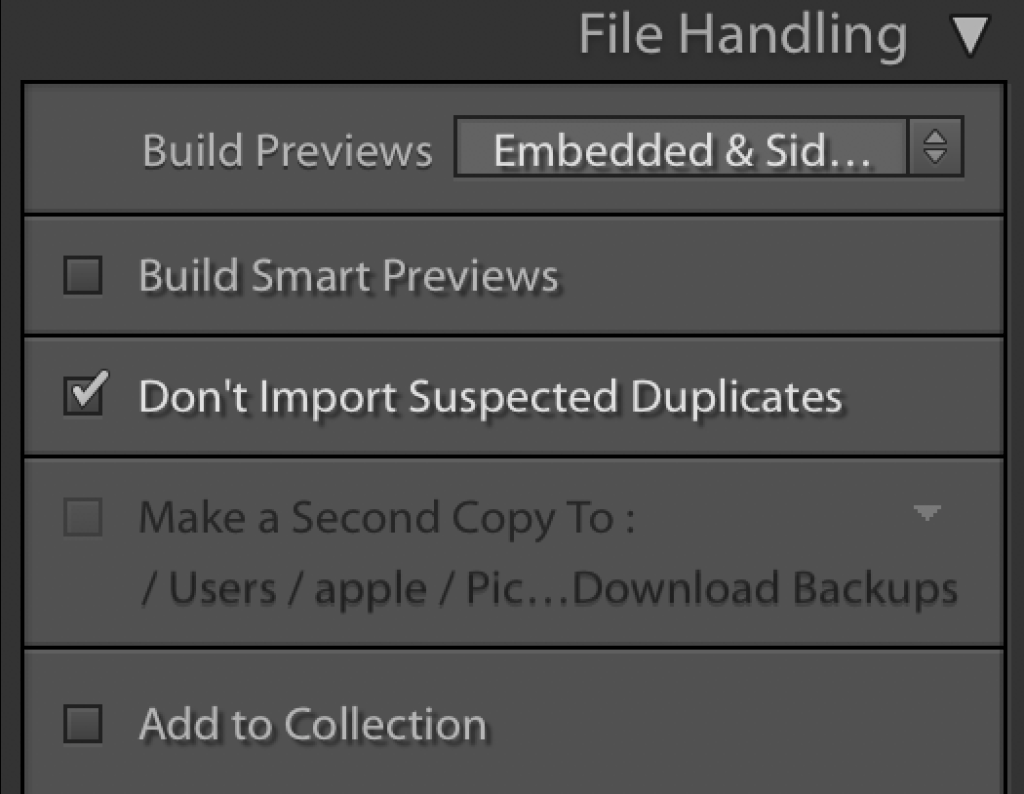
- Uncheck the option: Build Smart Previews. With this option, you can edit the smaller version of the file even if the Image is not located on your computer. These edits occur on a smaller DNG file. Uncheck it as you are not going to work on Lossy files.
- Check the option: Don’t Import Suspected Duplicates. If some images are already imported in the Catalog, then those images will not be reimported.
- Uncheck the option of Make a Second Copy to
- As you are importing the photos the first time, uncheck the option of ‘Add to Collection.’ You may use this option once you create your Collection. For now, keep it unchecked.
- Under Build Previews drop down there are four option
- Minimal
- Embedded and Sidecar
- Standard
- 1:1
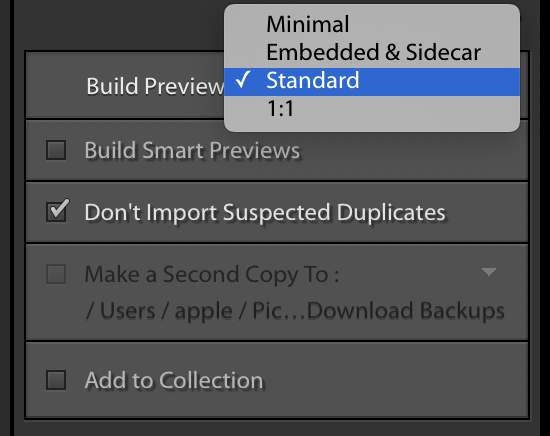
Each build preview renders the Image in a specific way. Also, each preview needs higher performance or may slow down the image rendering process.
As you go from Minimal to 1:1 Preview, Image rendering will get enhanced. On the other hand, the process will get a bit slower.
I recommend choosing Standard or Embedded & Sidecar. I feel comfortable in terms of image rendering and the time it takes for both the processes.
Choose either of the two and move on.
For the Tab > Apply During Import.
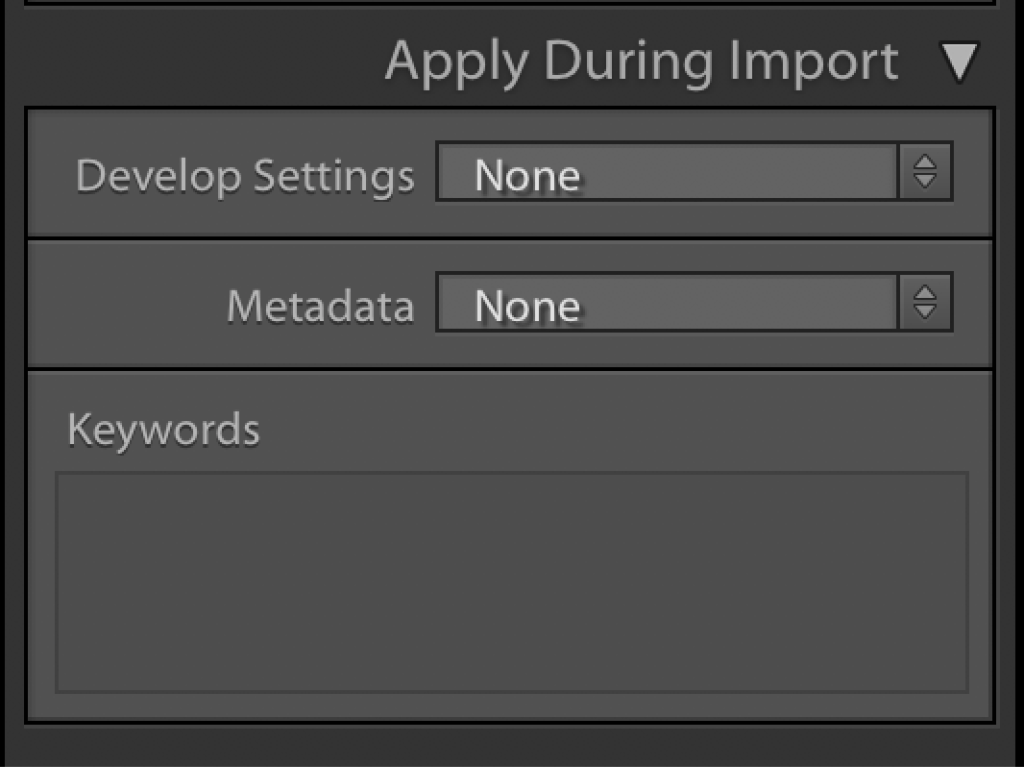
- Set Develop Settings > None
- Set Metadata > None
- Set Keywords > Leave it blank, or If you want to assign keyword based on Location type of images or any specific keyword, mention it here. Hence the keywords will be applied to the photos during import.
- Example: Tiger, India, AnimalPortraits
- Set the keywords as per your requirement. Or at this point, keep it blank.
Click the ‘Import’ button. Images will be imported, and Lightroom will navigate to Library Module.
You are fantastic! You have successfully imported the images into Adobe Lightroom.
Now it’s your turn!
I hope you enjoy my guide to Importing images in Adobe Lightroom.
Let me know your thoughts on the guide or if anything is missing in the guide.
Either way, let me know by leaving the comment below right now
EXPLORE. PHOTOGRAPH. INSPIRE
JOIN OUR NEWSLETTER AND GET THE BEST ARTICLES ABOUT DIGITAL POST-PROCESSING AND PHOTOGRAPHY TECHNIQUES. NO CHARGE. NO SPAM. ONLY LOVE.
This post is so helpful to get started using Lightroom’s very powerful Library Module. This should bring in a discipline in the way I manage my photos.
Thanks a lot!
Thank you Sarajit Sil. Good to know you found this article helpful. Thank You.