This article is a step-by-step guide on Monitor Calibration or Screen Calibration. It will help beginners and intermediate-level photographers to calibrate their monitors or screens for accurate post-processing of the images.

Are you wondering why your prints are showing different colors than how you have seen them on your monitor?
Are you confused after watching your images showing different colors on different devices or different monitors?
Well, then you are in the right place.
Because today in this article, you are going to learn about the basics of monitor calibration or Screen Calibration. The steps described in this article will help you to calibrate your monitor for the post-processing of your images.
Let’s dive right in.
In this article, you will learn about
- What is a color management system?
- Definition of Color Profile, Color Gamut, Color space, bit depth, Image Gamma, Display Gamma, and system gamma
- Need for monitor calibration
- Monitor calibration tools
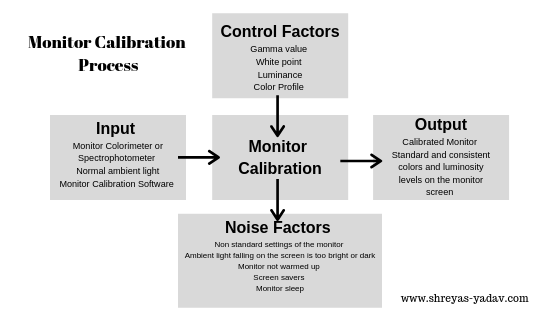
- Process diagram for the monitor calibration process
- Step-by-step guide for Monitor Calibration
What is Color management

© www.shreyas-yadav.com
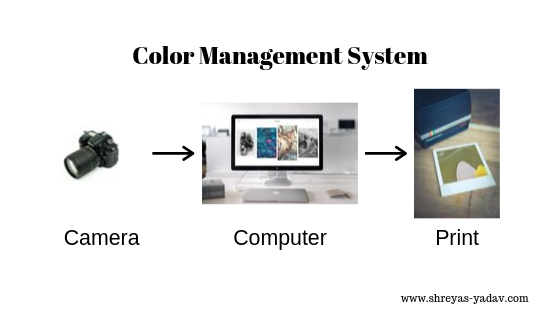
When you take a picture using a camera, the next step is you will view and edit the picture on your laptop, desktop, or monitor. Once the image is processed, you will either use it for web or print. It is a general imaging sequence you will follow.
In the imaging sequence, you should effectively control properties of color such as tonality, shades, and saturation. It helps in the exact reproduction of the colors in every stage of the imaging sequence.
Color management is a system where properties of colors are controlled at each imaging step precisely. Control of the color properties may not be accurate, but any deviation from the standard color properties can be found out and corrected.
A color management system helps you get consistent colors across each imaging step, such as a laptop or monitor screen, web, and print.
Before you edit a picture, here are some specific definitions you should know
- Color space and color profile
- Color Gamut
- Bit depth
- Gamma correction
- Monitor Calibration
Color Space and color profile
Color space is similar to the color palette in the digital world. It is a range of colors that human eyes can see.
In digital devices such as Cameras, Monitors, and printers the color space is defined by Red, Green, Blue ( RGB ), and Cyan, Magenta, Yellow, and Black (CMYK ) colors as a reference.
RGB model uses Red, Green, and Blue colors as primary and generates all other combinations of colors.
CMYK color model removes Cyan, Magenta, Yellow, and Black to generate various color combinations.
Digital cameras, Monitor screens, Desktops, Web browsers, and phones use the RGB color model. Printers work on the principle of CMYK color model.
Color Profile
A color profile is a digital representation of the color space. A specific range of colors in the color space is defined in the color profile.
As a photographer, you will be mostly working with three color profiles – sRGB, Adobe RGB, and ProPhotoRGB.
sRGB color profile consists of the smallest color space. sRGB color profile consists of a limited range of colors. This color profile is suitable for web Images or sharing images. sRGB color profile is a small and convenient color profile for sharing photos. However, this color profile has less amount of color information; hence, it is not suitable for photo editing work.
AdobeRGB color profile has a broad range of colors. AdobeRGB color profile is supported in cameras as well. AdobeRGB color profile is excellent for editing images, and it is widely supported across various digital cameras and photo editing software. However, this profile is not suitable for sharing photos on the web because most of web browsers work on sRGB color profiles and not on AdobeRGB. Hence image might look dull.
ProPhotoRGB color profile has the highest range of colors. It consists of an extensive range of colors that are beyond the visualization of human eyes. ProPhotoRGB color profile is used for high-end image editing. Similar to AdobeRGB color profile, the ProPhotoRGB color profile is not suitable for the web and sharing images but is perfect for advanced-level photo editing.
Which Color profile you should use for editing?
AdobeRGB color profile is excellent for editing because it supports a broader range of colors, and it is used across various digital devices.
Color Gamut
Color Gamut is a range of colors that are available in the color space.
Bit Depth
Bit depth indicates how many color combinations are available in the color space. In the digital camera, the colors are defined in terms of binary terms such as the 0’s and 1’s. Bit depth number determines the combination of the 0’s and 1’s. This, in turn, indicates a combination of unique colors available.
For example, 8 Bit means 2^8 = 256 colors available. Each bit is represented by three colors ( RGB ); hence total color combination possible is equal to 2 ^ ( 8 * 3) = 16777216. In this case, 8 is the Bit depth. Higher the bit depth, the greater the number of colors available.
While editing an image, select the highest bit depth such as 14 or 16-bit.
Gamma correction
Gamma value is defined as the relationship between actual luminance value and how it is interpreted in a digital device such as Monitor.
There are three types of Gamma
- Image Gamma
- Display Gamma
- System Gamma
Image gamma is the value of gamma applied by the camera.
Display gamma is the value of gamma that is applied by the device such as to monitor
System gamma is a net effect of Image Gamma and Display Gamma. Ideally System Gamma =1, but to have good contrast and dynamic range the System Gamma value is set higher than 1.
When you post-process your image on a monitor, Display Gamma is an important parameter. Generally, all the displays are standardized to the Display gamma value of 2.2. The gamma value of 2.2 is also embedded in the sRGB and AdobeRGB color profiles.
Hence before post-processing, an image checks what the Display Gamma value for your monitor is.
While you perform monitor calibration, the Display Gamma value will be adjusted. This process is Gamma Correction.
What is Monitor Calibration or Screen Calibration?
Monitor Calibration is the process of adjusting the parameters of the monitor display to bring the monitor in a standard state of the screen. Settings such as Display gamma, Luminance, White point, and color profile are adjusted during the monitor calibration process.

Reasons for Monitor calibration
- Consistent Luminance levels across the digital camera, post-processing software and output image ( for web and print )
- Standard and consistent colors across the camera, post-processing software, and output image with the help of Standard color space and color profile.
- Precisely control over the deviations in luminosity and colors across an entire color management system.
Monitor calibration tools
There are a few manual methods to calibrate the monitor. However, the results obtained by them may not be consistent. Hence, it is better to use specialized tools and software for monitor calibration.
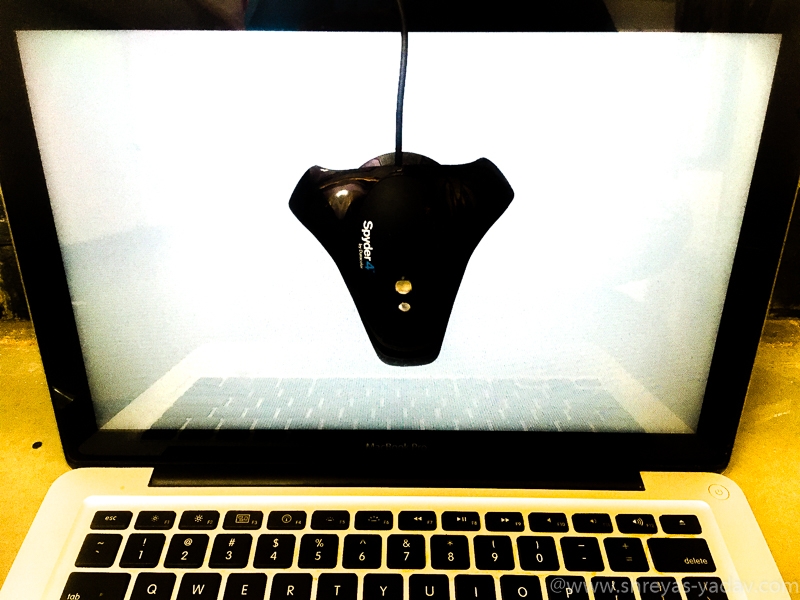
Monitor calibration is done using a Colorimeter or Spectrophotometer. This device comes with compatible software. The monitor calibration device looks somewhat similar to a computer mouse. You need to connect it to your computer via a USB port and hang it in front of the screen.
The calibration device mounted on the screen and installed calibration software perform a monitor calibration process.
There are multiple monitor calibration solutions available in the market. Here are some of the popular calibration solutions offered –
Data Color has a range of calibration products for monitor calibration.
To start with, some of the specific monitor calibration tools I recommend are

© www.shreyas-yadav.com
Steps for the monitor Calibration (or Screen Calibration) process
- Turn on your Laptop / Computer and keep the display On for 20 to 30 minutes, It will warm up the screen and will stabilize the display operation
- Turn off the screensaver or any other software programs that may interrupt the monitor calibration process. Similarly, turn off Auto-Brightness or monitor sleep option
- Make sure there is normal ambient light in the room. Avoid any direct light or dark environment on the monitor screen.
- Based on your monitor or laptop screen, reset the display parameters to default. Display parameters can be brightness, contrast, and saturation. Reset all the parameters to the default option or factory settings
- Install the software which comes with the calibration device you are using
- Connect the Calibration device to your laptop or desktop via USB or the Appropriate connectivity option available
- Launch the monitor calibration software
- Mount the monitor calibration device on your screen as indicated by the monitor calibration software
- As you have launched the monitor calibration software, follow the steps and actions as per the software. The software automatically calibrates and profiles the monitor. The monitor calibration process is handled by software, and the user requires limited intervention. Approximately the monitor calibration process takes around 20 to 30 minutes.
- You will be notified once the monitor calibration and profiling process are completed. You are all set for editing your images in Adobe Photoshop, Lightroom, or any other image-editing software
- The frequency of monitor calibration can be once a month or once every three months.
Note:- Monitor calibration and profiling helps to edit the images. This process helps to get consistent colors and luminosity while post-processing the photos. If you are going to print the picture, you may want to perform the printer profiling as well. We will cover the topic of printer profiling in another article.
Let me know if you have questions regarding monitor calibration, in the comments below
EXPLORE. PHOTOGRAPH. INSPIRE
JOIN OUR NEWSLETTER AND GET THE BEST ARTICLES ABOUT DIGITAL POST-PROCESSING AND PHOTOGRAPHY TECHNIQUES. NO CHARGE. NO SPAM. ONLY LOVE.
Excellent content with simple and apt language used which can be understood by any photographer. Very well detailed information. Thanks for sharing shreyas.
Thank you, Vaibhav. Good to know this article is adding value.
Fantastic article and detailed explanation. Thanks for sharing your immense knowledge with us.
I found the article to be very helpful.
Thanks and regards
Sarajit