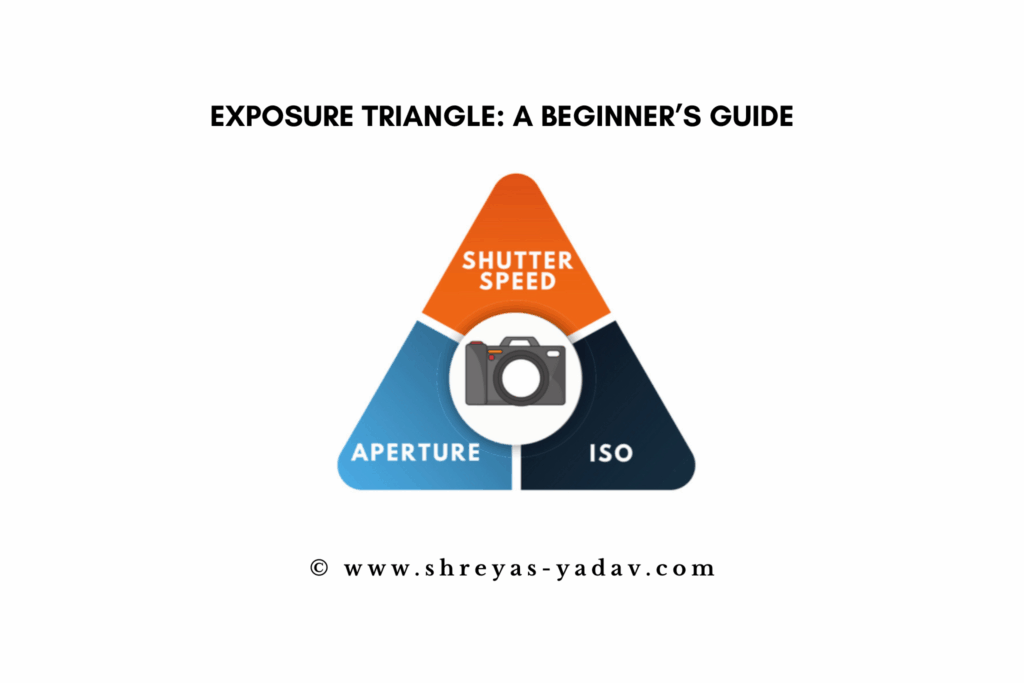
Exposure Triangle: A Beginner’s Guide: In this article, you will learn the basics of Aperture, Shutter Speed, and ISO. Aperture, Shutter Speed, and ISO are major parts of the Exposure Triangle in photography.
Understanding the Exposure Triangle will help you to create better images. Concepts explained in this article will help you to photograph a picture with the Exposure that you want!
Why do my images look too dark or too bright?
Why does the photo appear grainy and the colors look dull?
Why don’t I see the sunlight and colors in my image as I saw in the actual scene?
Does this sound familiar to you? Do you find it challenging to set the right exposure settings while taking a photo?
Well, it’s time to set the exposure settings correctly.
With concepts and settings explained in this tutorial, you will be able to set the exposure correctly as per the scene. Once you learn about Aperture, Shutter Speed, ISO, and the exposure triangle, the quality of your images will improve!
The best part is that you can use the techniques discussed in this article with any brand of DSLR or Mirrorless cameras ( even compact cameras)
Let’s dive right in
In this tutorial, you will learn about
Let’s start with Aperture
Aperture
Aperture refers to the opening of the lens through which light passes.
Aperture is indicated as f/1.4 , f/2.8, f/4, f/5.6, f/8, f/11, f/16 ( F Number)
F Number is calculated as F Number = Lens focal length ( mm ) / Diameter of lens opening ( mm )
Example:
- Lens with a focal length = 300 mm and a lens opening diameter = 107 mm will have an aperture of f/2.8
- Lens with a focal length = 300 mm and a lens opening diameter = 75 mm will have an aperture of f/4
- Lens with a focal length = 300 mm and a lens opening diameter = 53 mm will have an aperture of f/5.6
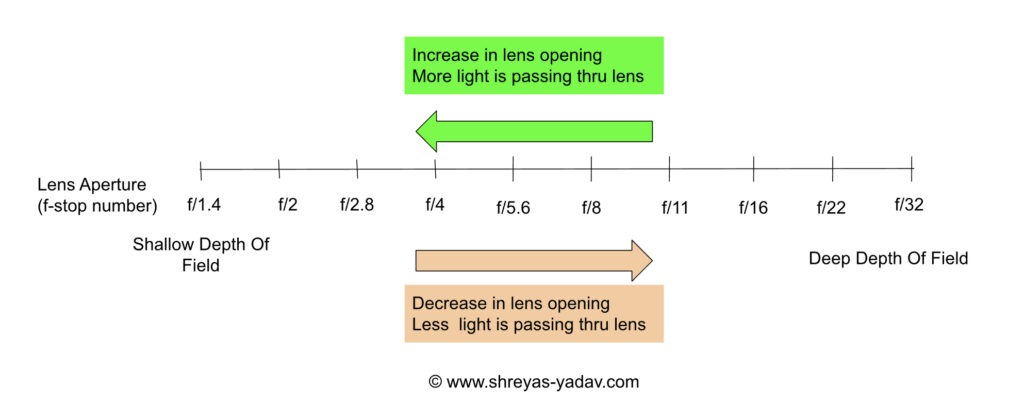
You can observe that at a given focal length (say 300 mm), as the aperture goes from f/2.8 to f/4 to f/5.6, the lens opening diameter decreases from 107 mm to 75 mm to 53 mm, respectively.
This indicates the light passing the lens opening will be less for the f/5.6 aperture as compared to the f/2.8 aperture.
Lenses with a smaller f-number, such as f/2.8, are called fast lenses, whereas lenses with a larger f-number as f/5.6, are referred to as slower lenses.
When you change the aperture from f/2.8 to f/4 to f/5.6, it is referred to as stopping down the aperture. Due to this, less light will pass through the lens.
As the opposite of this, if you change the lens aperture from f/5.6 to f/4 to f/2.8, you are opening up the lens. And you will allow more light to pass through the lens.
Using the lens aperture, you can control how much light passes through the lens. The smaller the f-number ( f/2.8 ) more light is passed through. The larger the f-number ( f/5.6 to f/8 ), the less light is passed.
Aperture is one of the critical parameters to control the depth of field. ( Depth Of Field: DOF is the area in a photograph that is in focus)
- A smaller f-stop, like f/2.8 aperture, produces a shallow depth of field, hence you get smooth blur for the background and foreground.
- A larger f-stop, like f/8 aperture, produces a deep depth of field; hence, the background and foreground will lose some of the blurriness. Some details in that area are visible.
In summary:
- Use a smaller f-stop number to allow more light to pass through the lens, and use a larger f-stop number to allow less light to pass through.
- In low light conditions smaller f-stop number is desirable.
- To get a shallow depth of field, use a smaller f-stop ( less area will be in focus )
- In harsh light conditions larger f-stop number will help to stop some of the light.
- To get a deeper depth of field with more area in focus, use the larger f-stop.
Next, we will learn about Shutter Speed
Shutter Speed
Shutter speed determines how long the image sensor is exposed to the light. ( Once the light hits the image sensor in your camera, the image is created )
Shutter speed is a time and is measured in seconds.
Shutter speed is the time for which the camera shutter is open and allows light to pass through.
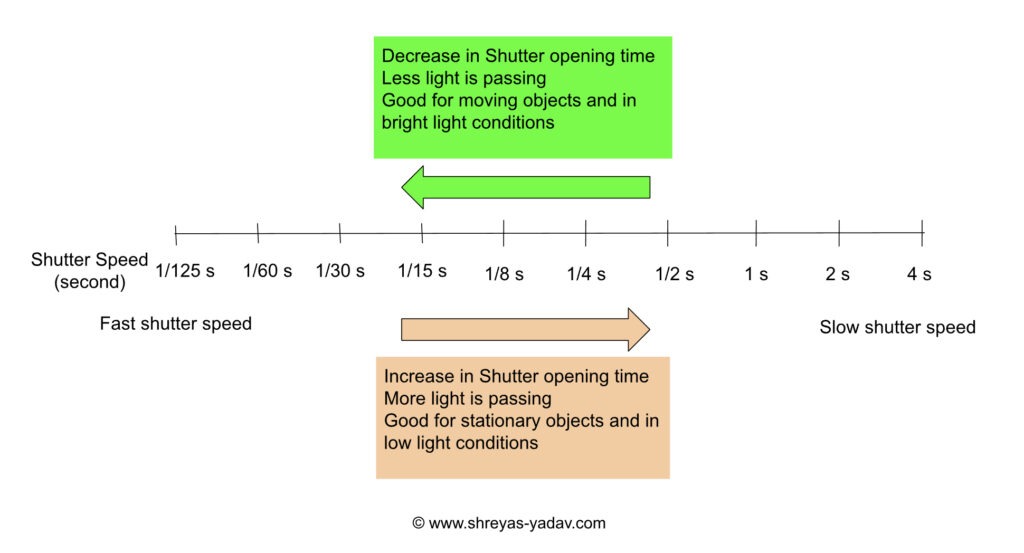
Shutter speed is indicated as 1 s, 1/2 s,1/4 s , 1/8s , 1/15s , 1/30s , 1/60 s, 1/125 s, 1/250 s and so on.
Shutter speed
- 1s means the shutter will be open for 1s, allowing light to pass through.
- 1/2 s means the shutter will be open for half a second. Light will be cut down in half as compared to a 1s shutter speed.
- 1/4 s means the shutter will be open for one-fourth of a second. Light will be cut down by half as compared to1/2 s shutter speed.
- 1/8 s means the shutter will be open for one-eighth of a second, and so on.
- 1s, 1/2 s, 1/4 s mean slower shutter speeds. The image sensor will be exposed to light for a longer duration. It will allow more light to pass through.
In low light conditions, slow shutter speeds are required.
To create motion blur or stationary objects slow shutter speed can be used.
Whereas 1/1000s, 1/2000s, and 1/4000s are the fast shutter speeds.
The image sensor will be exposed to light for a short duration.
This will allow less light to pass through due to the short duration.
If the light conditions are bright, you can use faster shutter speeds.
In order to freeze the action, such as a sports event, wildlife or bird action, or any fast action, use a fast shutter speed.
Now, let’s take a look at ISO
ISO
For the film cameras, the sensitivity of film was indicated by the term ISO.
Now, for DSLR or Mirrorless cameras same ISO terms are used. However, for an image sensor, there is no multiple sensitivity. But varying ISO can give the the simullar effect for Digital cameras. For example, by changing ISO, brightness, or noise in the image changes.
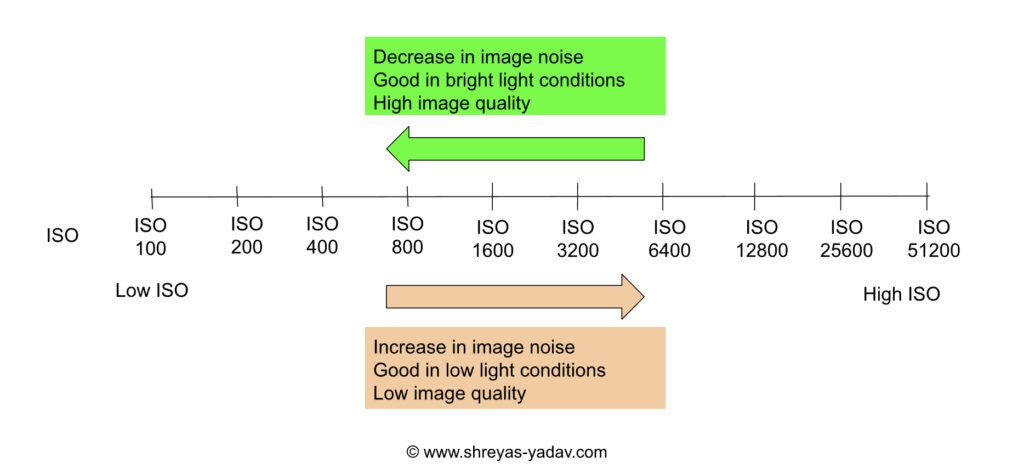
ISO speed or ISO sensitivity is indicated as ISO 100, ISO 200, ISO 400, ISO 800, ISO 1600, ISO 3200, ISO 6400.
If the light conditions are good, then lower ISO values can be useful. But, in order to photograph images in lower light conditions, higher ISO values are required.
Images with lower ISO values will have less noise, and overall image quality will be good.
On the other hand, a higher ISO will result in more image noise. Image quality will degrade with higher ISO values.
However, to freeze the fast action, you need a higher shutter speed. Hence, to get a higher shutter speed, you have to increase the ISO. You will be able to freeze the action perfectly, but you may also see image noise and degradation in image quality.
Generally, ISO 100, ISO 200, or ISO 400 are referred to as Low ISO values. ISO 3200, ISO 6400, and ISO 12800 are referred to as Higher ISO values.
Now, let’s take a look at the Exposure triangle
Exposure triangle
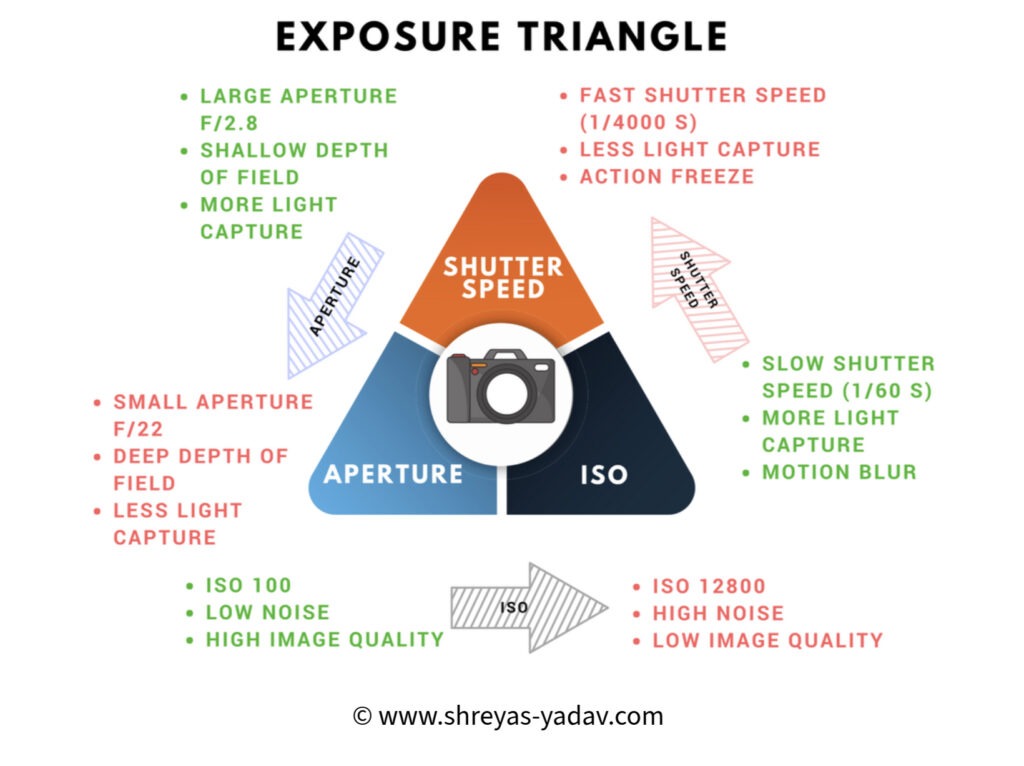
Aperture, Shutter speed, and ISO are the main parameters of the Exposure triangle. These parameters have a major effect on the image exposure.
In order to get the intended exposure, you need to select the Aperture, Shutter speed, and ISO accordingly.
Here are some starting points to get the right exposure settings for a given image.
Aperture:
- If the light is low, then use the bigger aperture ( Smaller f-stop number ) like f/2.8
- If the light is bright, you can use a smaller aperture ( larger f-stop number ) like f/8
- If you want a shallow depth of field, use a bigger aperture such as f/2.8
- If a deep depth of field is required, then use a smaller aperture like f/8
Shutter Speed:
- If the light conditions are low, consider using the lowest possible shutter speed, such as 1/60s or 1/100s
- If there is good light, then you can use fast shutter speeds such as 1/1000s, 1/2000s, and so on
- In order to freeze fast motion then use faster shutter speeds. And to get smooth motion blur or slow-moving/stationary objects, consider using slower shutter speeds
ISO:
- If light is low, then use higher ISO values (ISO 1600, ISO 3200) to get a brighter image.
- Whereas in good light conditions, you can use slow ISO speeds (ISO 100, ISO 200). However, with ISO increase, there is always a tradeoff between Image quality and Noise.
- Higher ISO can get you an image, but the quality of the image will be lower.
- Also, a Lower ISO can get you good image quality, but there is a chance you may miss the image action due slow shutter speed
Now I would like to hear from you. Now it’s your turn
Do you find this article useful ? or if you have any question, I would love to hear that in the comments below
EXPLORE. PHOTOGRAPH. INSPIRE
Join our newsletter for the best articles about Digital Post-Processing and Photography techniques. No charge. No Spam. Only love.
Leave a Reply