This article is a step by step guide on how to use range mask in adobe Lightroom for applying targeted adjustments. This definitive guide will help beginners and intermediate level photographers to master targeted image adjustments while post-processing image in Adobe Lightroom.
When I started editing my nature images, it was difficult for me to make targeted adjustments in an image. I was struggling with Adobe Lightroom to get a correct targeted color and tonal adjustments.
I was having a hard time to select the bright sky in a landscape image. I was not able to get the right eyes of the wildlife. I was wondering to select the flower and adjust its colors. I was clueless about how to remove a yellow or blue color cast in an image. So this list goes on
Does this sound similar to you? Are you struggling to make targeted image adjustments in digital post-processing – here is your definitive guide on targeted adjustments in Adobe Lightroom
In this article, you will learn how to make targeted adjustments effectively.
I have used these exact steps to make targeted adjustments in Adobe Lightroom
Today I will show how you can do the same.
What is a targeted adjustment?
In an image, there are specific areas where you need to make corrections such as highlights/shadows, saturation, exposure, and contrast adjustments.
These corrections are required only at specific areas and not in a whole image. These tonal or color adjustments are known as Targeted adjustments.
Why Are Targeted adjustments required?
Once you have made global adjustments such as adjusting white balance, setting black/white point, adjusting vibrance and saturation, it is time to address small problem areas in the image.
Examples can be
- Selectively adjusting the tones and colors of the sky
- Adjusting colors of the flower
- Recovering shadows and highlights from the face of a wildlife
- Selectively sharpening the bird
- Exposure and contrast fine-tuning of the animal
For targeted adjustments, there are 3 useful tools in Lightroom. They are located on the top of the basic panel.
- Graduated filter
- Radial filter
- Adjustment brush
The Graduated filter is useful in the following scenarios –
- When there is significant isolation between foreground, object, and background
- Landscape images, Wildlife in its habitat, Wildlife, and birds with isolated background
The Radial filter is useful in the following type of photographs –
- When the main object is well surrounded by its habitat such as Tiger sitting next waterhole in forest or bird seating the tree
- There is less or no isolation between foreground, background, and the, main objects such as a flower on the bush or animal portrait
The Adjustment brush tool –
- When you want to select the areas in an image manually, the Adjustment brush tool is helpful
- If the targeted adjustment has to be done in a bit more complex area, the adjustment brush tool is convenient
Range Mask
Each tool mentioned above has 3 types of range mask. With range mask, you can select the area on which targeted adjustment needs to apply. Range mask uses three types of masks ( or methods ) to make a selection.
- Color
- Luminosity
- Depth
- Color – In an image area selection is done using color as a reference. Selection is based on the color in an image.
- Luminosity – In this method, the selection is done based on light levels or luminosity levels. You can make a selection based on the intensity of the light such as bright and dark
- Depth – In the Depth range mask method, you can select the area based on the specific depth range in an image. However, depth map data should be included in your image. If your image does not have depth map data, then this option is greyed out. As of now, this feature is available with the latest iPhones only.
In this guide, you will learn how to make targeted adjustments using Color and Luminosity range mask.
Let’s dive right into the step by step guide –
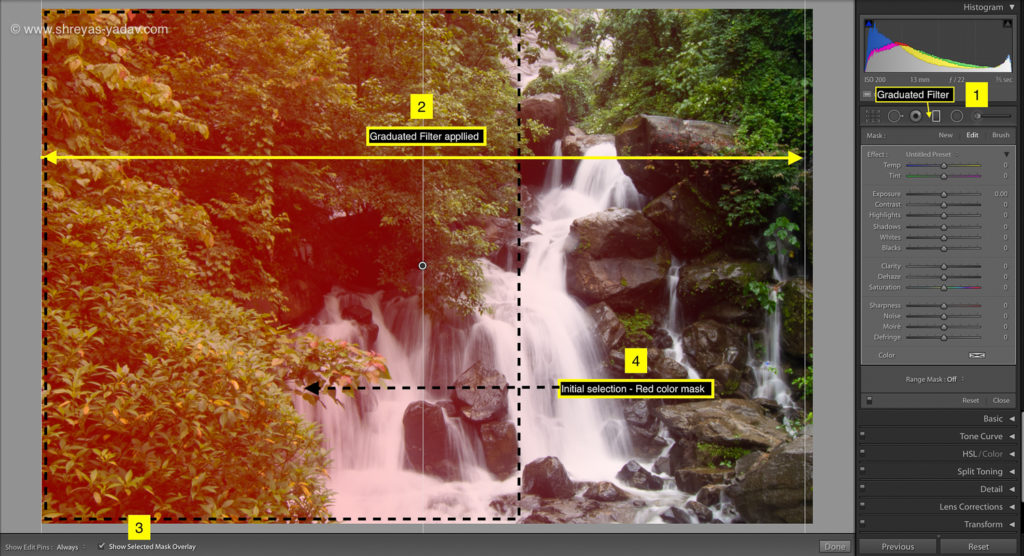
Graduated filter – Color Range Mask
- Select the Graduated filter tool (Keyboard Shortcut: M), located at the top of the Basic panel
- Make the initial selection on the area to be selected. For making an initial selection, click on the image and drag till required.
- Check the Show selected mask overlay checkbox at the bottom of an image. You will the initial selection in red color.
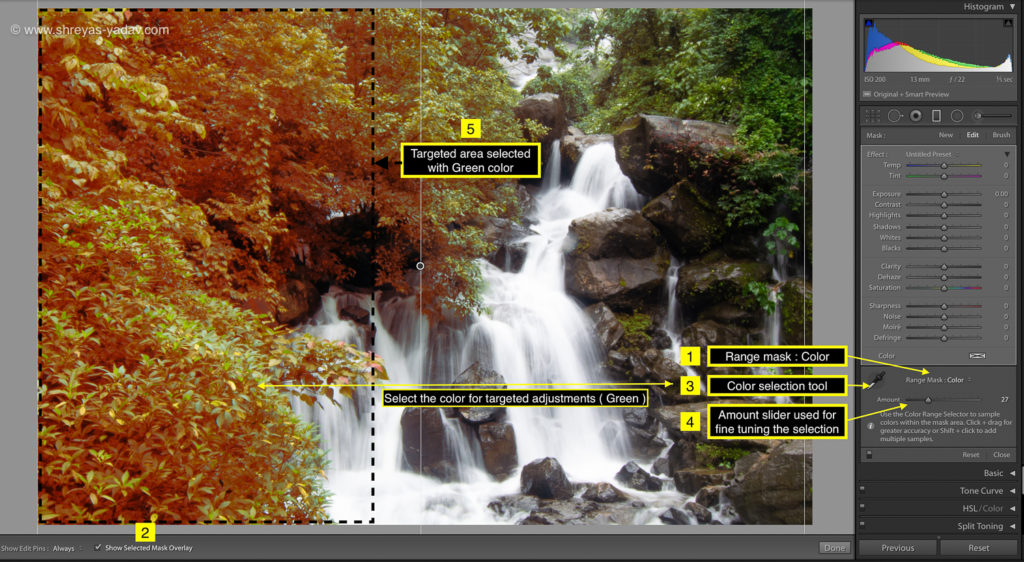
- In the Range mask option, select the Color from the drop-down.
- With Color range selection tool, click on the color in an image for selecting that area.
- For selecting multiple colors, either you click and drag on an image for selection or press Shift key and click on the colors which you want to select.
- If required, fine-tune the color selection by using the amount slider. If you increase the Amount, the color range will increase and if you reduce the amount slider, then the color range will decrease.
- I recommend either to select a single color or multiple colors with Shift key option. It helps to select the area precisely.
- Check the Show selected mask overlay option ON. You will see the selected area with a red color ( or Red color mask )
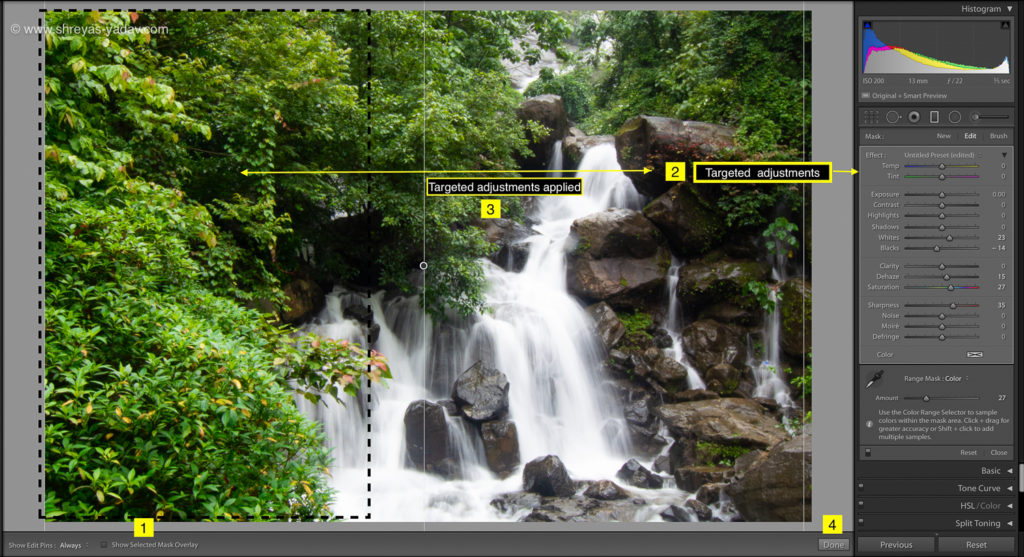
- Once the selection is done, on the Mask > Edit panel make the targeted adjustments.
- You can choose the targeted adjustments as indicated in the editing panel, but I recommend following edits in the sequence.
- Black and white point adjustment
- Saturation
- Sharpness
- Shadows and highlights
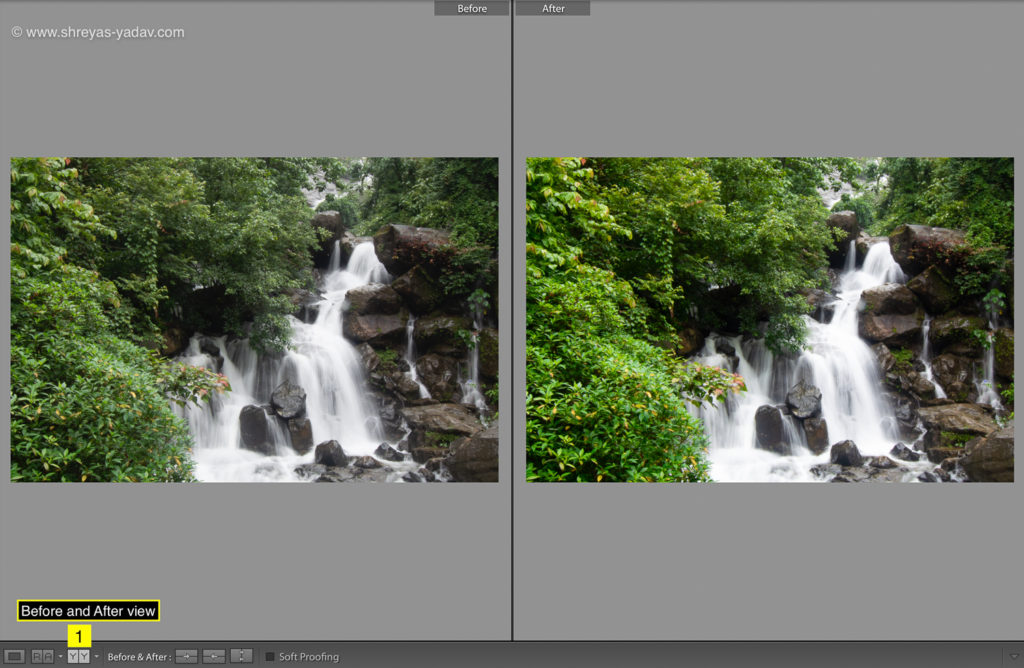
These targeted edits I find very powerful. However, you can choose any targeted adjustments as per image requirements.
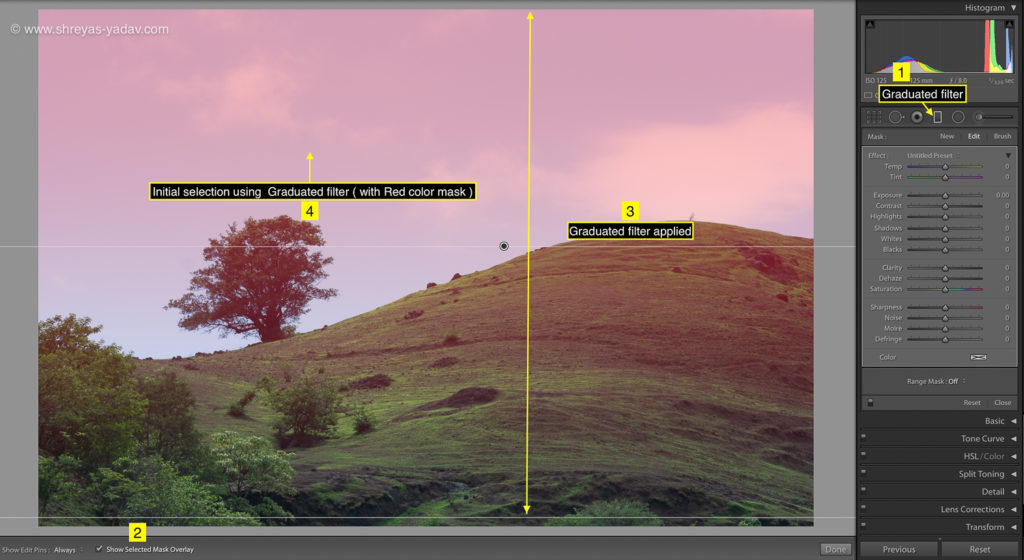
Graduated filter – Luminance Range Mask
- Select the Graduated filter tool (Keyboard Shortcut: M), located at the top of the Basic panel
- Make the initial selection on the area to be selected. For making an initial selection, click on the image and drag till required.
- Check the Show selected mask overlay checkbox at the bottom of an image. You will see the initial selection in red color. Now uncheck that checkbox.
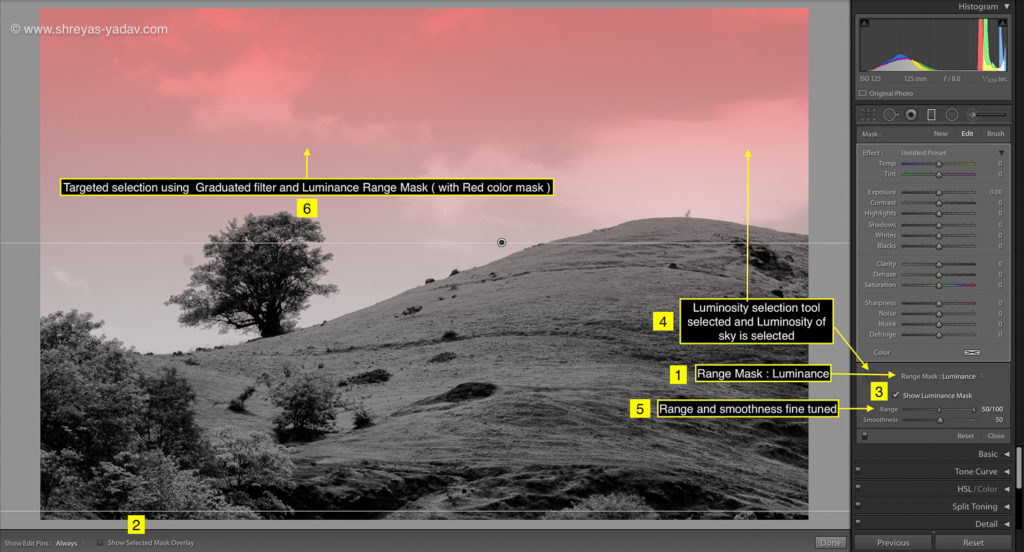
- In the Range mask option, select the Luminosity from the drop-down.
- With Luminance range selection tool, click on the luminosity which you want to select and edit. Prefer a smaller area as it will help to select a range of Luminosity precisely.
- There are two additional sliders in Luminosity range mask
- Range – Range slider helps to fine-tune ( or adjust ) the Luminosity range
- Smoothness – Smoothness controls the gradient between the selected mask and the nonselected area.
- Check the Show Luminance mask option ON. You will see a black and white image and the selected area with a red color ( or Red color mask).
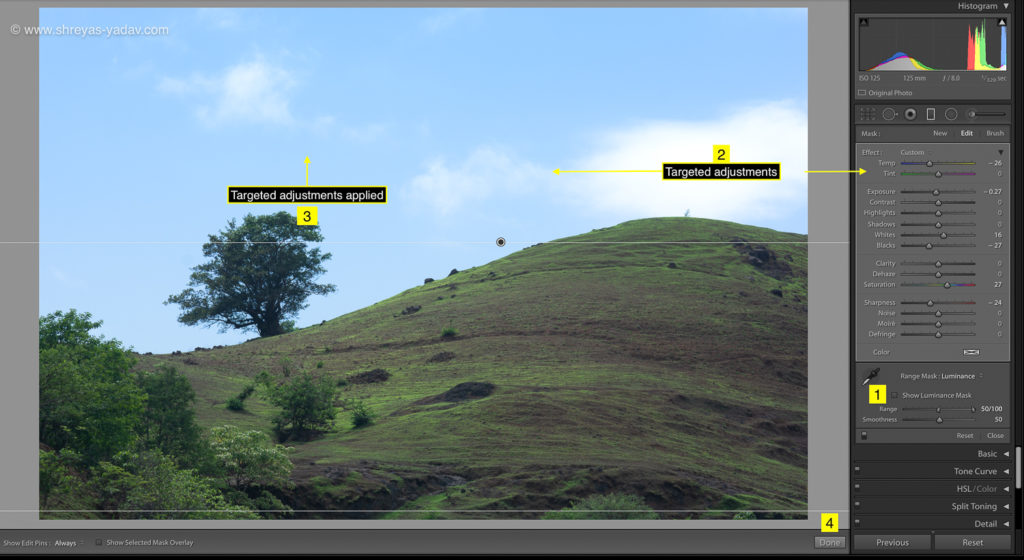
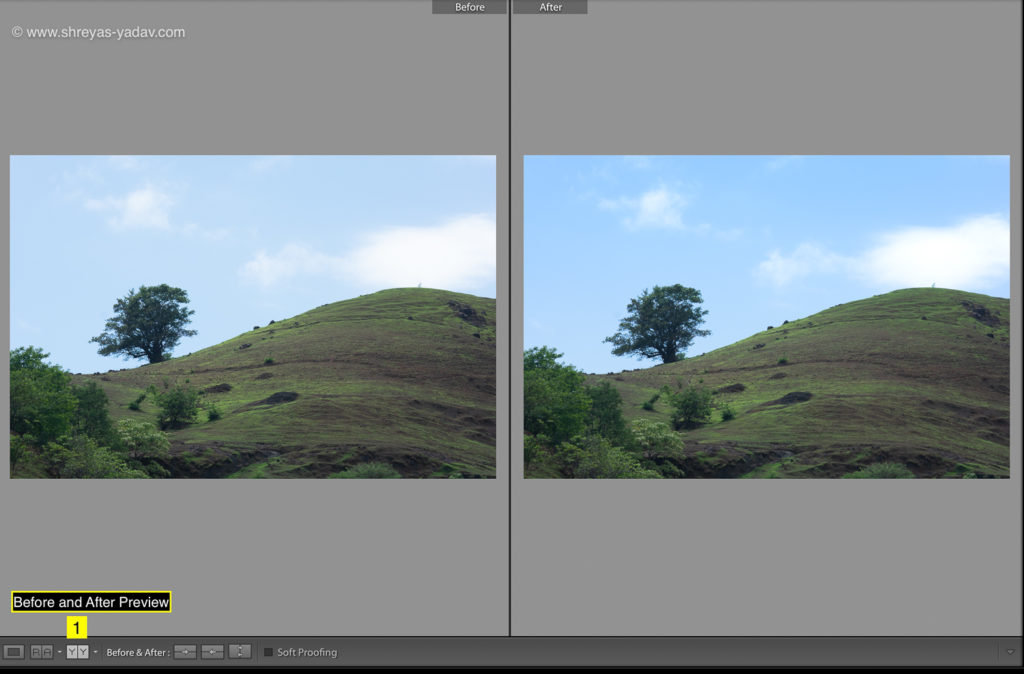
- Once the selection is made, on the Mask > Edit panel make the targeted adjustments.
- You can choose the targeted adjustments in the editing panel as per image requirements.
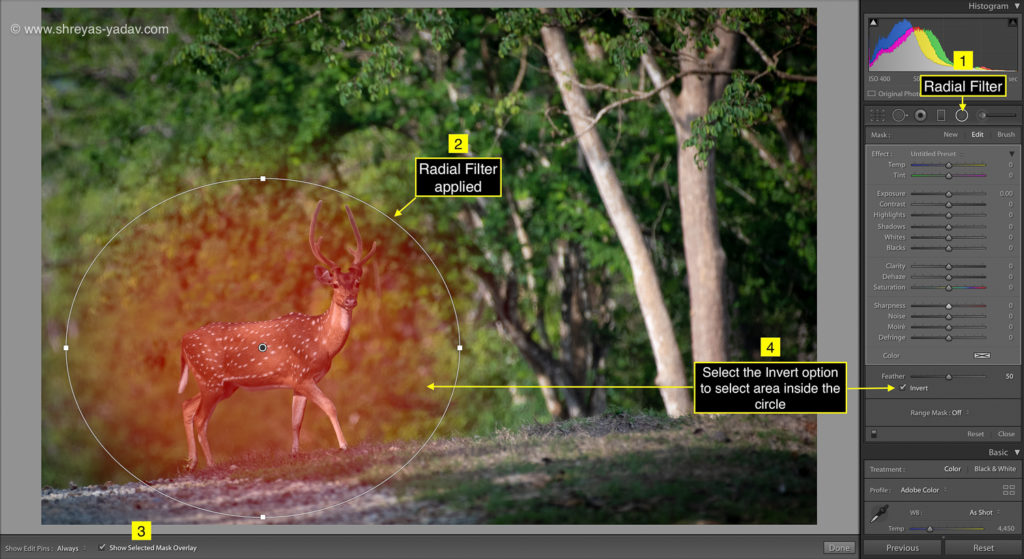
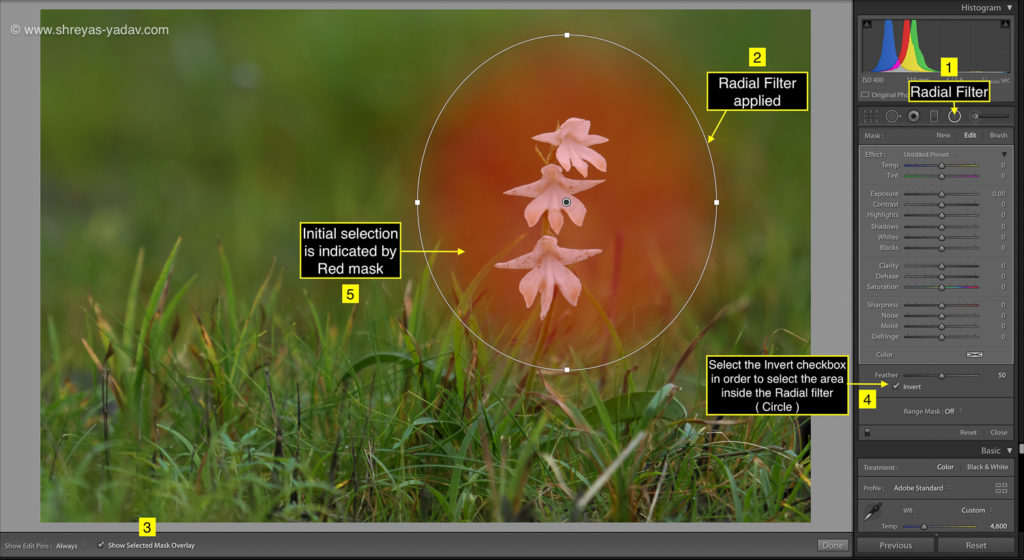
Radial filter – Color Range Mask
- Select the Radial filter tool (Keyboard Shortcut: Shift + M), located at the top of the basic panel
- Make the initial selection on the area to be edited. For making an initial selection, click on the area, and draw a circle or oval. Check the Show Selected mask overlay checkbox at the bottom of an image
- By default area outside the radial, filter will be selected. Check the Invert checkbox to select the area inside the radial filter ( Circle/oval )
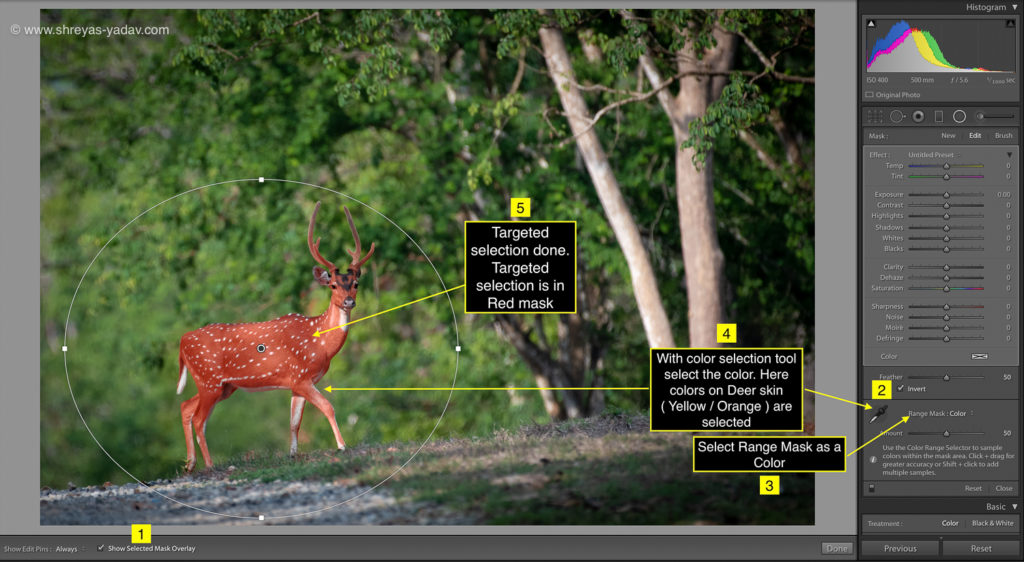
- In the Range mask option, select the Color from the drop down
- With Color range selection tool, click on the single color for selecting that area
- To select multiple color range, either Click and Drag around the area to be selected or Press Shift and Click on the colors to add to the selection
- Fine-tune the color selection by using the amount slider. If you increase Amount, the color range will increase, and if you reduce the amount slider, then the color range will decrease.
- I recommend either using single color selection or color selection by pressing the Shift key and adding the colors. This will help you yo select the area to be edited precisely
- Check the Show Selected mask overlay option on. The selected area will be seen as Red color mask
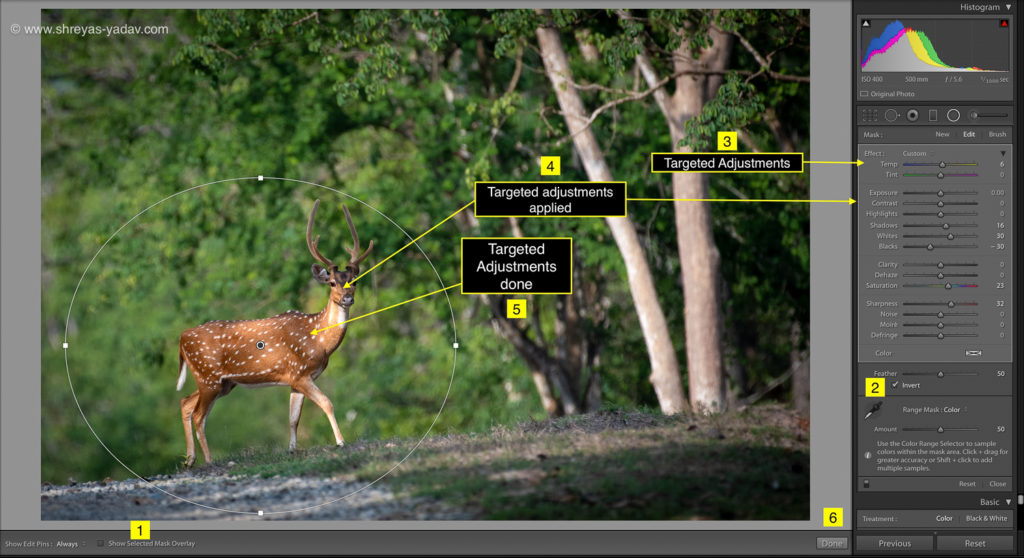
- After the selection is complete, on the Mask > Edit panel make the targeted adjustments.
- You can choose the targeted adjustments as indicated in the editing panel, but I recommend following edits in the sequence.
- Black and white point adjustment
- Saturation
- Sharpness
- Shadows and highlights
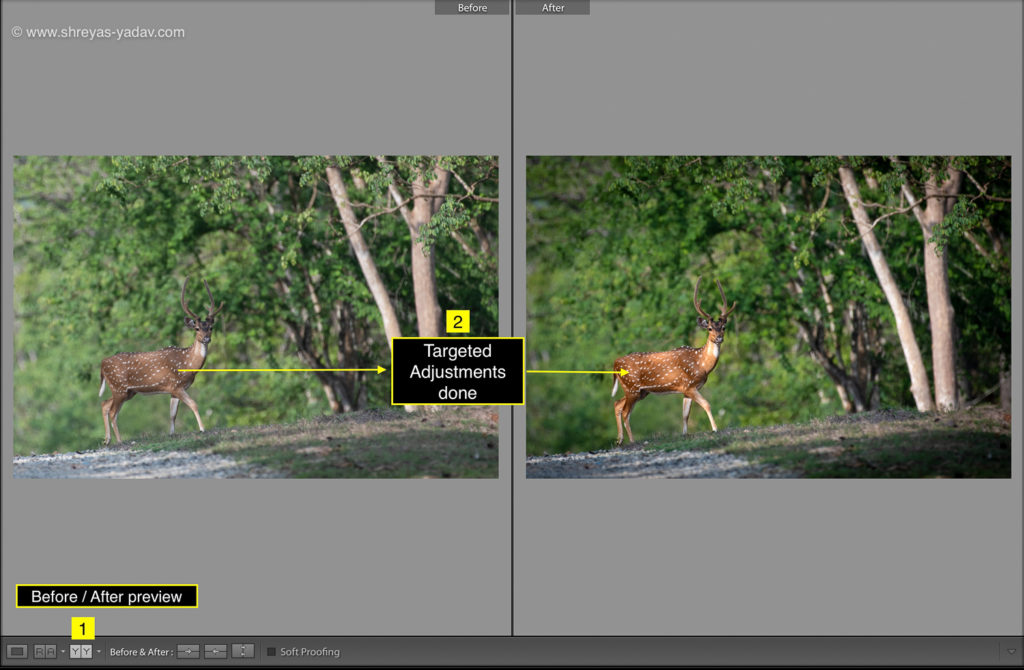
These targeted edits I find helpful. However, You can choose any targeted adjustments as per image requirements.
Additional note – For selecting an area outside the radial filter ( refer step # 3 ) uncheck the Invert box. Other steps for editing area outside the radial filter are the same as step 4 to 11
Radial filter – Luminosity Range Mask
- Select the Radial filter tool (Keyboard Shortcut: Shift+ M), located at the top of the Basic panel
- Make the initial selection on the area to be edited. For making an initial selection, click on the area, and draw a circle or oval. Check the Show Selected mask overlay checkbox at the bottom of an image
- Check the Show selected mask overlay checkbox at the bottom of an image. You will see the initial selection in red color. Now uncheck that checkbox.
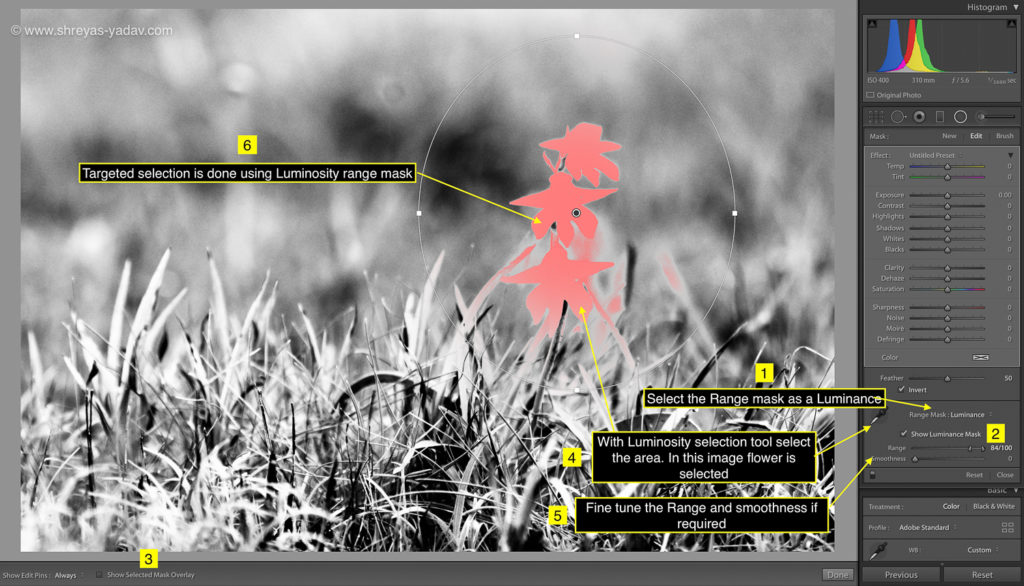
- In the Range mask option, select the Luminosity from the drop-down.
- With Luminance range selection tool, click on the luminosity which you want to select and edit. Prefer a smaller area as it will help to select a range of Luminosity precisely.
- There are two additional sliders in Luminosity range mask
- Range – Range slider helps to fine-tune ( or adjust ) the Luminosity range
- Smoothness – Smoothness controls the gradient between the selected mask and the non selected area.
- Check the Show Luminance mask option ON. You will see a black and white image and the selected area with a red color ( or Red color mask).
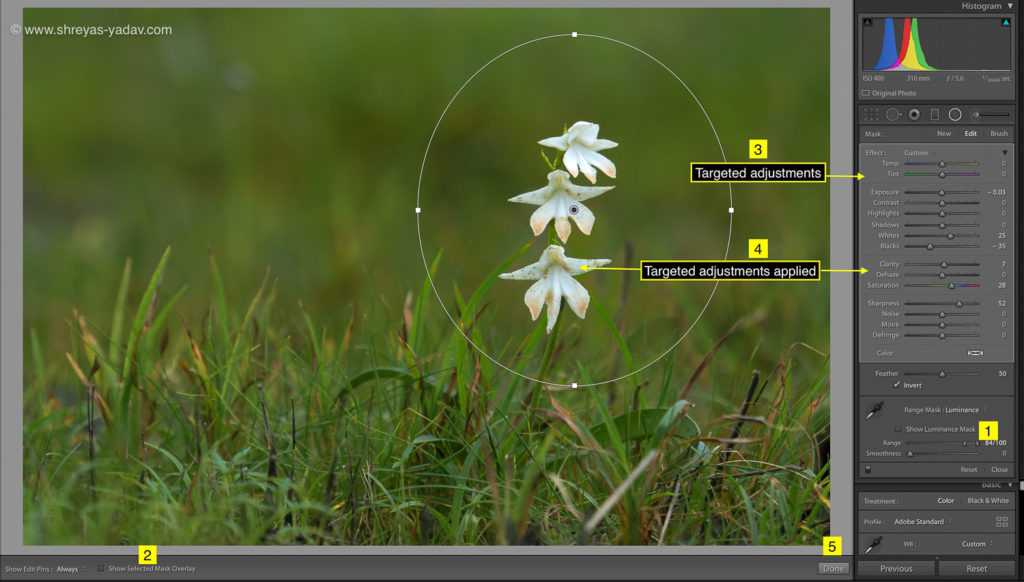
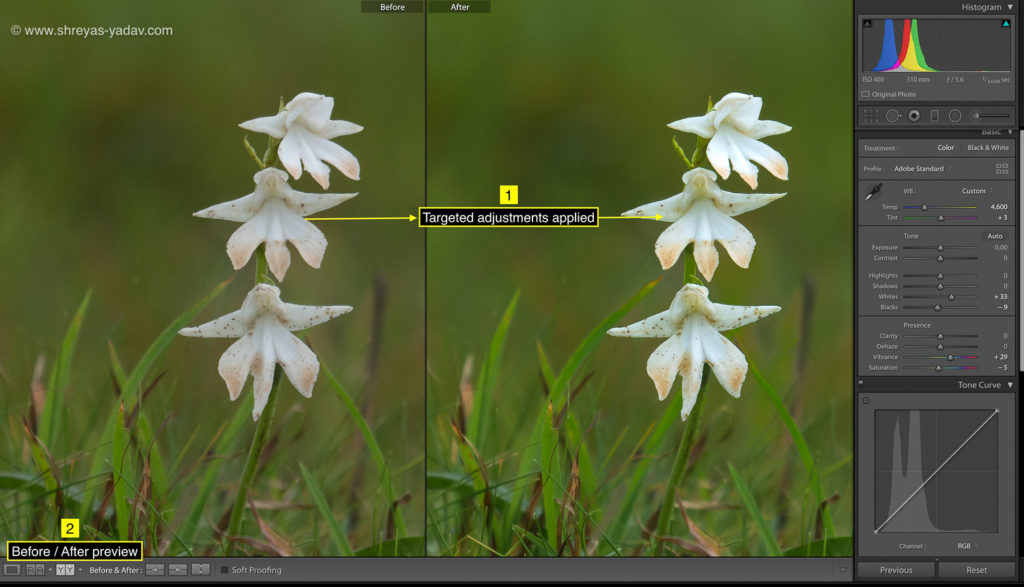
- Once the selection is made, on the Mask > Edit panel make the targeted adjustments.
- You can choose the targeted adjustments in the editing panel as per image requirements.
Adjustment Brush – Color and Luminosity Range Mask
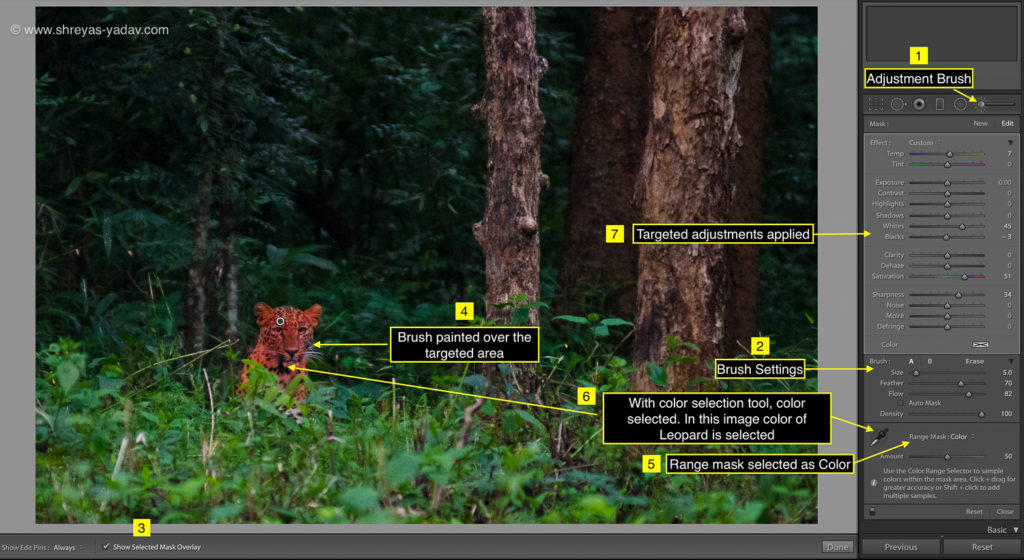
- Select the adjustment brush tool ( Keyboard shortcut: K )
- There are 4 siders under the adjustment brush tool
- Size – This slider controls the Size of the brush. For smaller area selection use a small-sized brush. For larger areas selected large size brush
- Feather – Feather controls the transition between the selected mask and the non selected mask. Feather ensures a smooth transition between the edited and unedited area
- Flow- Flow option controls the intensity with which the edits are applied. Higher flow the intensity of the edit will be more
- Density – Density acts as an Opacity here. Lower the density lower the opacity and vice versa
- Select the brush size based on the area you want to select
- For feather, you can choose a value between 40 to 70
- Flow values you can start with the value from 50
- Set density in between 50 to 100
- Above-Mentioned numbers are guideline and starting point. You can fine-tune those number or change those number as per targeted adjustment requirement of your image.
- Paint on the area which you want to select. Click on the area to be selected and paint over it
- Check the Show selected mask overlay checkbox at the bottom of an image. You will see the initial selection in red color. Now un-check that checkbox.
- Now similar to graduated filter or radial filter, select the Range mask as a Color or Luminance
- Select the area based on Color or Luminosity using the steps explained in Color and Luminosity range mask
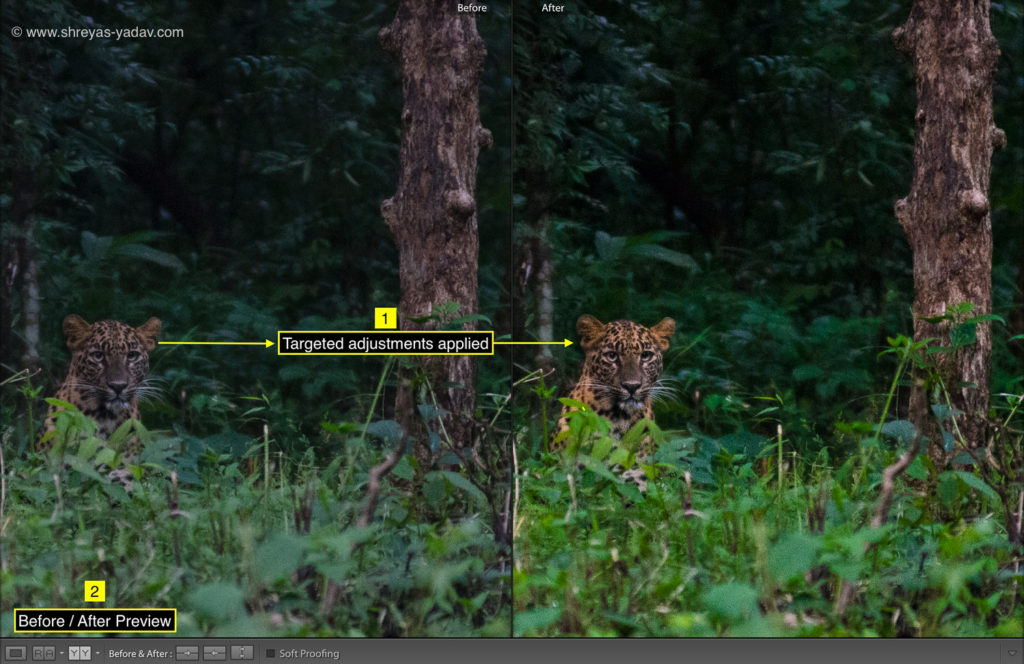
- After the selection is complete, on the Mask > Edit panel make the targeted adjustments.
- You can choose the targeted adjustments, as indicated in the editing panel. You can choose targeted adjustments as per image requirements.
Recommendation on Filters and Range mask
You are now equipped with two best tools in Adobe Lightroom – Filter and Range mask.
Initially, you may find it is much stuff, but it is not. Because each image will not require to use all the filters and range mask, generally speaking, you will be using only one type of filter and one type of mask for targeted adjustments.
As you start using this tool one at a time, you will master it. After that, you can easily use all the filters and range masks for targeted adjustments.
Here are some specific recommendations on Filters and Masks
Graduated filter – Color / Luminosity range mask can be used at
- Sunset at the ocean or mountain
- Clouds over the forest, ocean, and mountains
- Water in the forest with the sky in the backdrop
- Wildlife scape images
- Images photographed in the desert
- Mountains, grasslands, rivers, and sky
- Overall landscape images
Radial filter – Color / Luminosity range mask
- Wildlife in its habitat ( Close up ) – such as bear in a forest
- Wildlife near river, stream, rocks, and forest ( Close up image )
- Bird near water, fruits, on a perch, streams and the rock
- Wildlife action images
- Flowers on the tree and bushes
- Forest leaves
- Nature images inside the deep forest
- Images of tree leaves, flowers, and fruits
- Wildlife and bird portraits
Adjustment brush – Color / Luminosity range mask
- Uneven rocks
- Wildlife or birds in the clutter such as forest and leaves
- A flock of birds or herd of animals with some clutter
- Small or complex shapes in an image
Examples mentioned above are the guidelines. You will be able to find many more examples while you photograph Nature and Wildlife.
As you follow this step by step guide, you will master the targeted adjustments in Adobe Lightroom. These techniques will help you to get beautiful and accurate targeted adjustments every time you process the image.
Now it’s your turn! Apply these techniques and make your Nature and Wildlife Images awesome…
Which Filter and Range mask you find helpful and significantly improved your images? Let us know in the comments.
If you find this article helpful, remember to share it with your friends.
EXPLORE. PHOTOGRAPH. INSPIRE
JOIN OUR NEWSLETTER AND GET THE BEST ARTICLES ABOUT DIGITAL POST-PROCESSING AND PHOTOGRAPHY TECHNIQUES. NO CHARGE. NO SPAM. ONLY LOVE.
Fantastic article Shreyas! I appreciate yourself for putting down these useful processing tips which will help the readers tremendously. Well explained and you have made this very simple to understand.
A big thanks! Will look forward for more!👍
Thanks and regards
Sarajit
Thank you. Great to know these tips are helping you.
Thanks
Shreyas