Here is a Step-by-Step Adobe Photoshop tutorial that will teach you how to Blur the Background in wildlife images using 3 simple Photoshop techniques.
I think you will agree with me when I say :
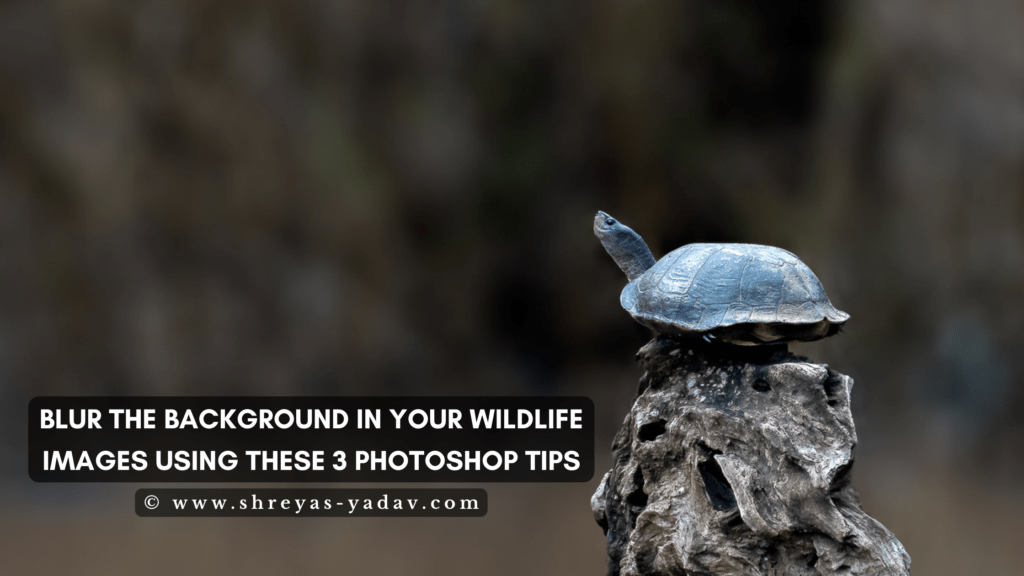
Getting the beautiful blur background ( Bokeh ) in your wildlife images is hard.
This is because wildlife is moving quickly, the background might be distracting or the background will be close to the Wildlife.
Well, it turns out you can create awesome wildlife images with smoothly blurred backgrounds using simple Photoshop techniques.
These photoshop techniques will help you to blur the background in wildlife images. It will help the main wildlife object to pop up beautifully.
In fact, these same photoshop techniques helped me to create some beautiful wildlife images.
This is a post-processing technique that may be more manipulative than some people are comfortable with. If you are comfortable with post-processing the images, remember that the fun in editing is setting your own limits for how far you want to go, and experimentation is a great way to improve your post-production skills.
With that out of the way, let’s dive in.
3 Photoshop Tips to Blur the Background in Wildlife Images
1. Blur the Background using Lens Blur
Here is an image of Sambar deer. While having a Safari in the Bandipur Tiger Reserve ( In India ), we came across this Curious Sambar Deer. This Sambar gave me a few moments to take a photo.
In the background, you can see the trees near to the Sambar deer. And, this bit of sharp foliage is distracting. We will blur the leaves and trees in the background using a Lens Blur.
Whenever there is a smooth transition between the foreground ( Here grass in front of Deer), the main subject ( Sambar deer ), and a background ( Here trees and leaves )- you will find the Lens blur is quite helpful to Blur the background.
Image Exif : f/5.6 , 1/320 s and ISO 800
- Open the image in Adobe Photoshop
- Create a Background Copy Layer by Selecting the background layer and dragging at Create New Layer Icon ( + symbol)
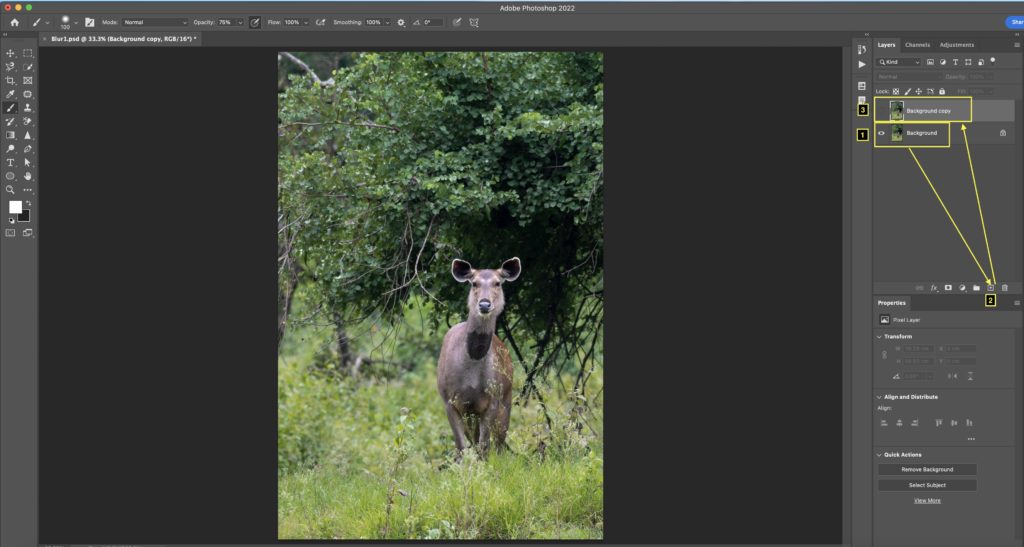
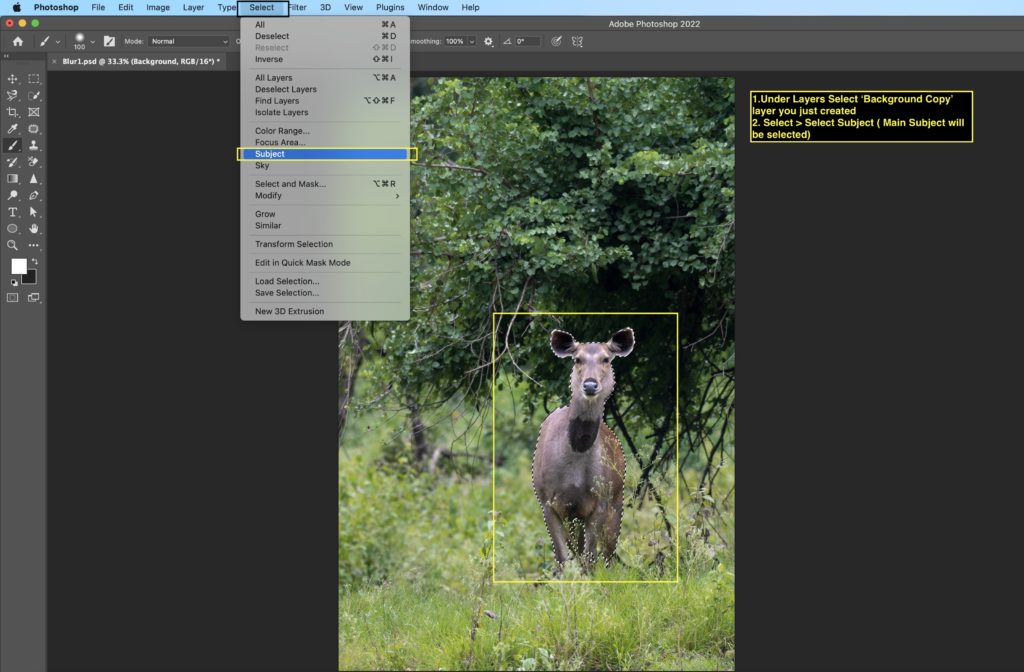
- Select the Background copy layer, which you just now created.
- Select the Subject using an option: Select > Subject.
- In this image, the Sambar deer will be selected as a Subject
Also, check out simple selection techniques in Adobe Photoshop
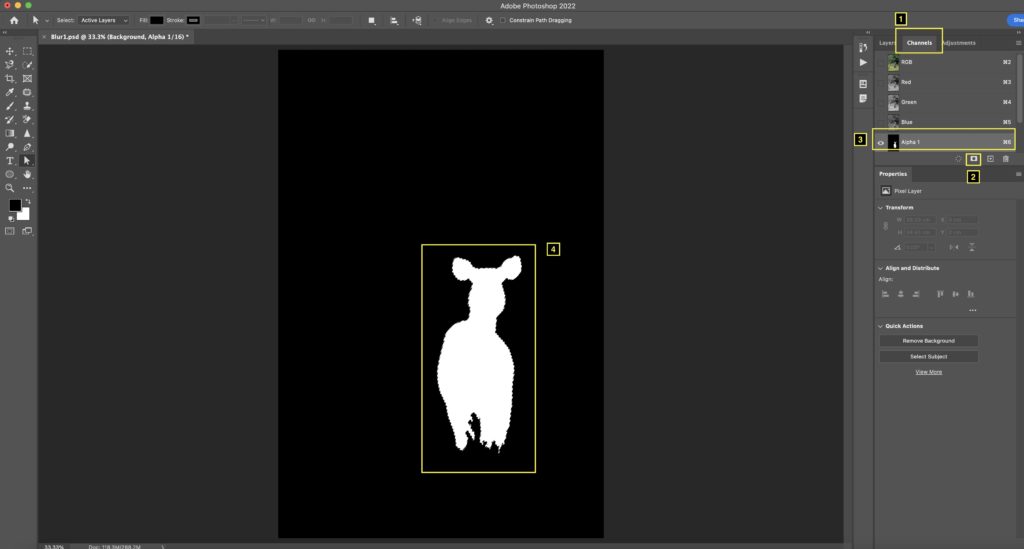
- Now, we will create a channel using this subject selection
- Next to the Layers panel, select Channels.
- Select the option: ‘Save selection as a Channel’
- New Channel with Subject selection is created with the name of Alpha 1. ( You can change this name if required )
- We don’t want to blur the foreground. In this image, the foreground is grass in front of Sambar deer.
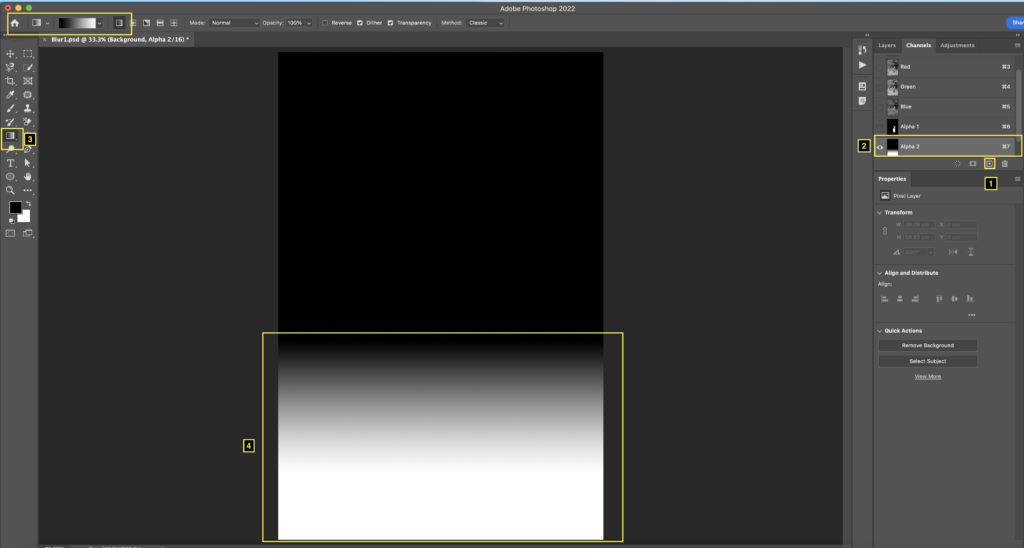
- Hence, we will create another channel using a Gradient Option.
- Under the channel panel, select an option: Create a New channel. ( Symbol for creating a new channel is ‘+’)
- A new channel with the Alpha 2 name is created. Select this channel.
- Select a gradient tool and create a Gradient as shown in the below image.
- A new channel with Gradient will be created. ( Channel name: Alpha 2 )
- Now, it’s time to combine these two channels.
- Press CTRL ( Windows ) or Command ( Mac) and click on the Alpha 2 channel.
- While CTRL/Command key is pressed, press the Shift key and click on Alpha 1 Channel.
- Click on Save Selection as a Channel. Refer to the below image for reference.
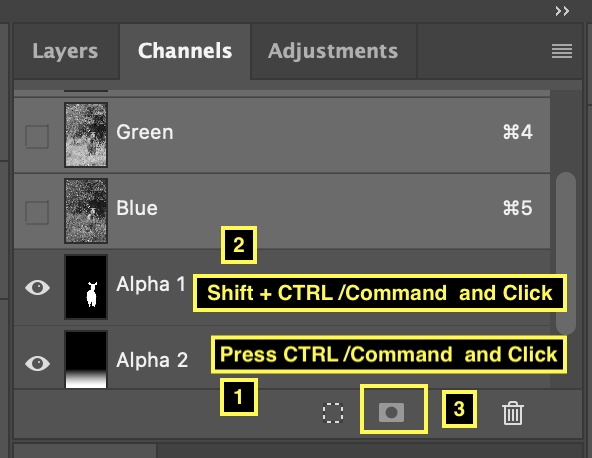
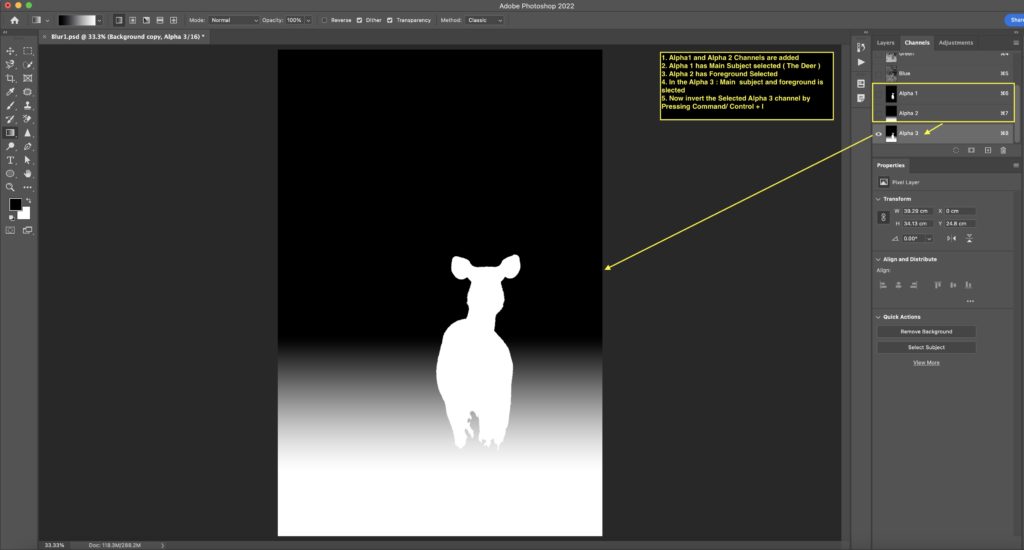
- New Channel with the name Alpha 3 is created.
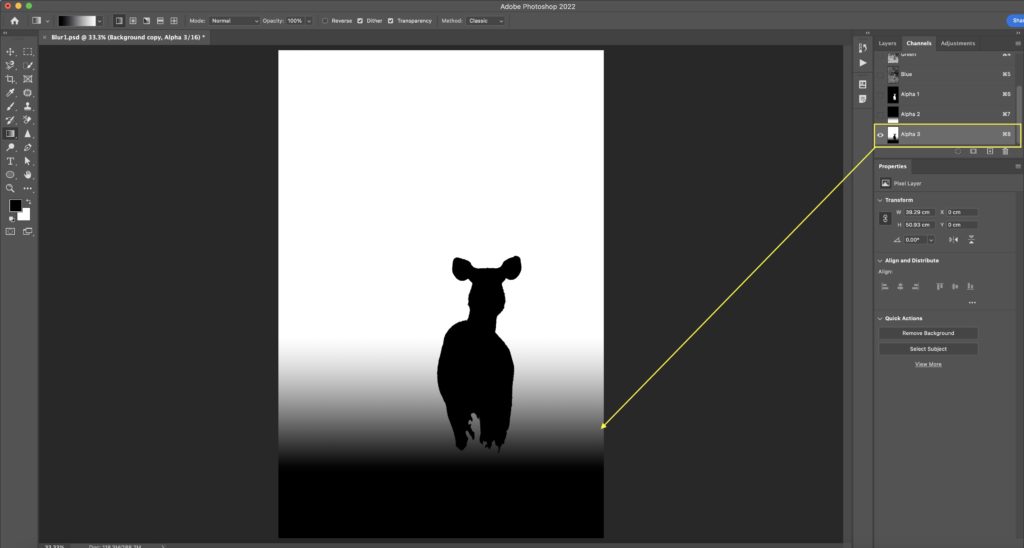
- Select Alpha 3 channel. Invert the selection by Pressing CTRL ( Windows ) / Command ( Mac) + I
- Here is what the Selection will look like ( Refer to Alpha 3 channel in the below image)
- Sambhar deer and foreground are in black color. The background is indicated with white color.
- Hence the blur which we will apply will be visible only in the background.
- It’s time to apply the Lens blur now. Click on the Layers panel. Select the Background copy layer which you created earlier.
- Click : Filter > Blur > Lens Blur

- The lens blur window will open up. Refer to the below image for applying the Lens blur.
- The important step here is, under the Depth Map option > Select the Source as Alpha 3 Channel.
- This is the same Alpha 3 channel which you created in the earlier step. Lens blur will be applied with reference to the Alpha 3 channel.
- Set Blur focal distance to 0.
- Under the Iris option,> Adjust the radius and blade curvature radius as per the blur required.
- These are some of the basic settings for Lens blur. You can experiment with other options as per your image requirements.
- Click OK
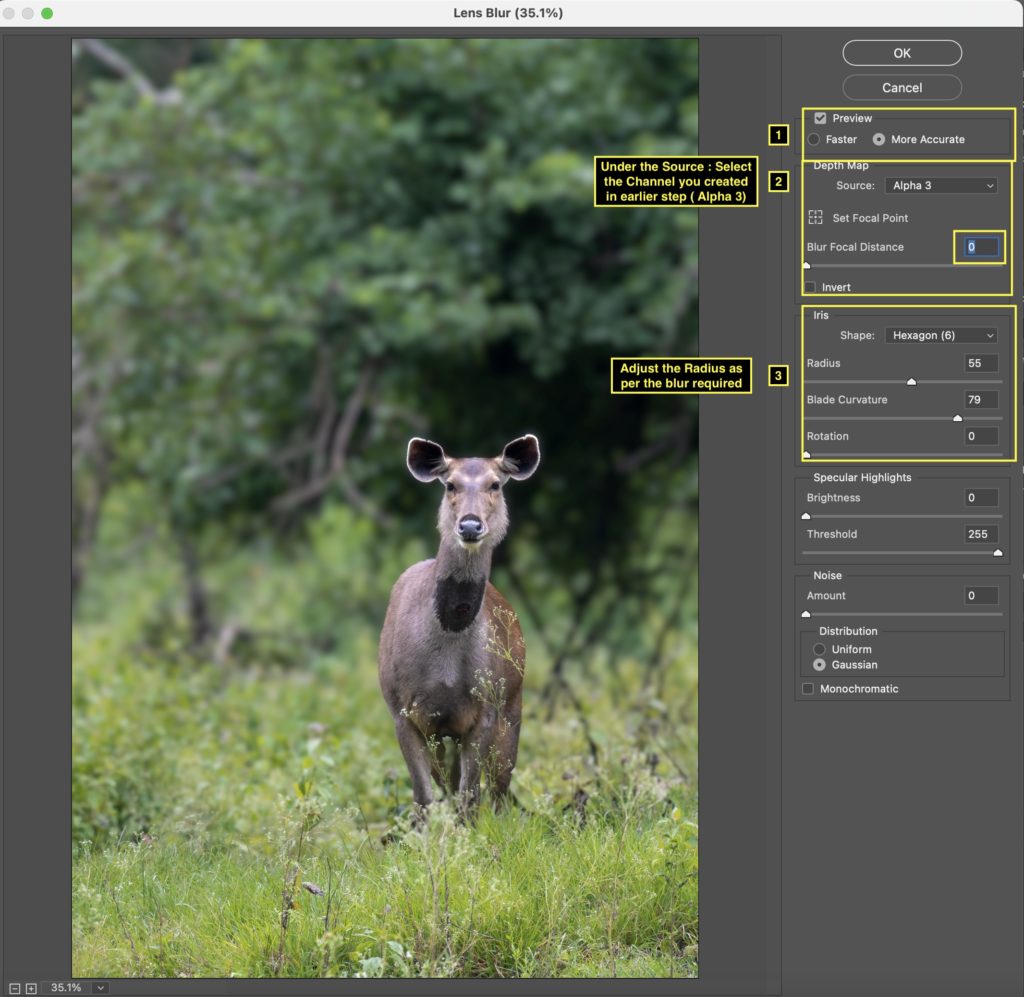
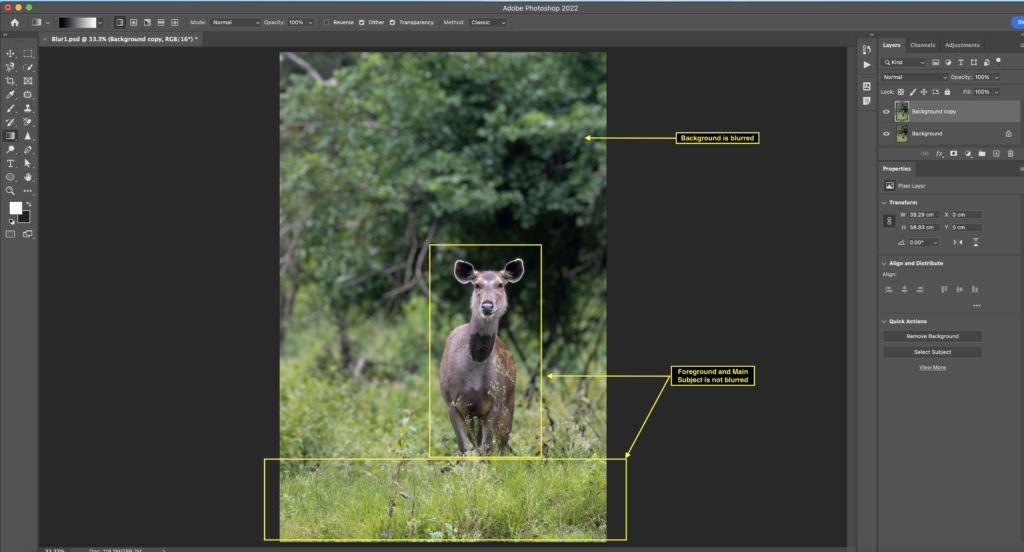
- Once you apply the Lens blur, you will see the Blur is applied to the background only.
- Hence, Sambar deer and foreground is sharp and background is blurred. Refer to the below image.
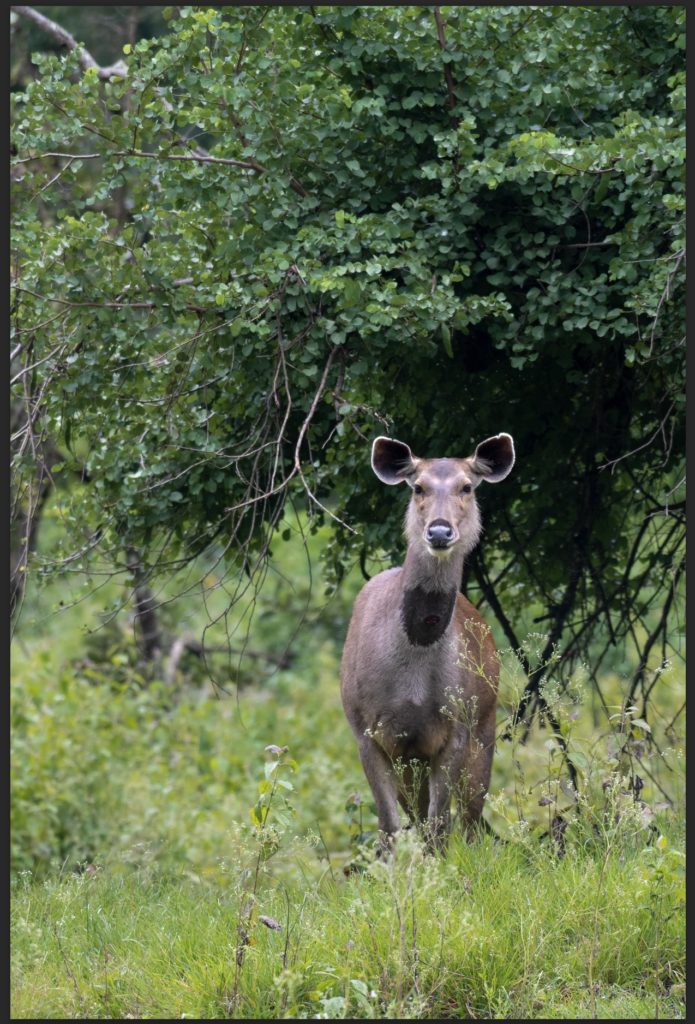
- Here is an Image BEFORE applying the Lens Blur
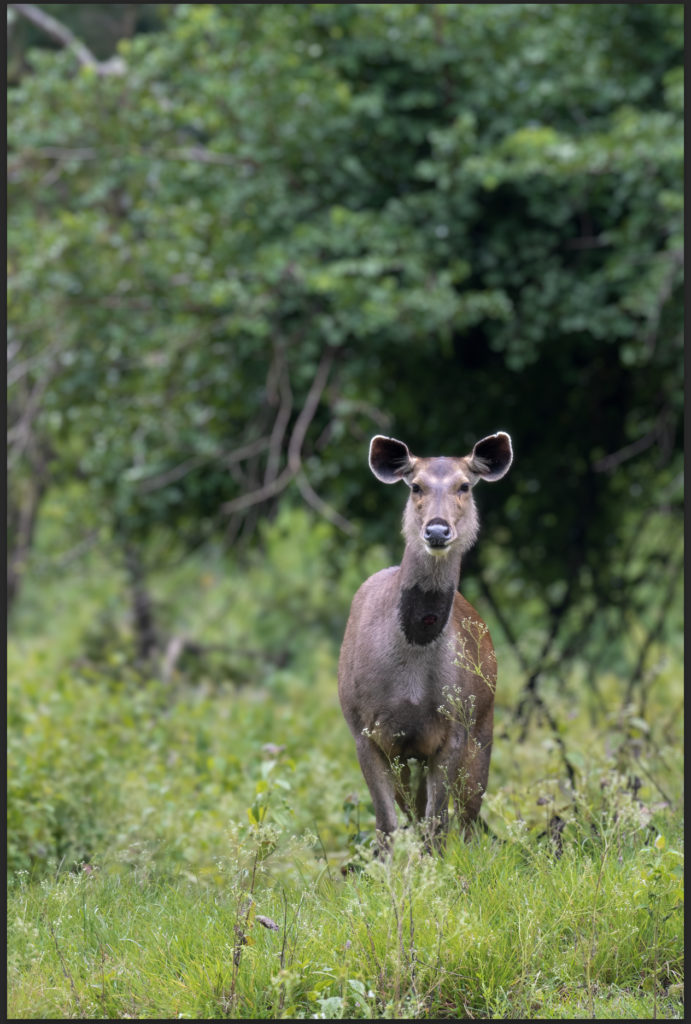
- And, this is the image AFTER applying the Lens Blur.
- You will see the Background is blurred and the Main object ( Sambar deer) pops up nicely.
2. Blur the Background using Field Blur
During the Jungle Safari in Bandipur Tiger reserve, we came across a waterhole in the forest. There was beautiful sunshine covered with clouds. In this lovely light setting, a Turtle was basking on the dry tree log in the water.
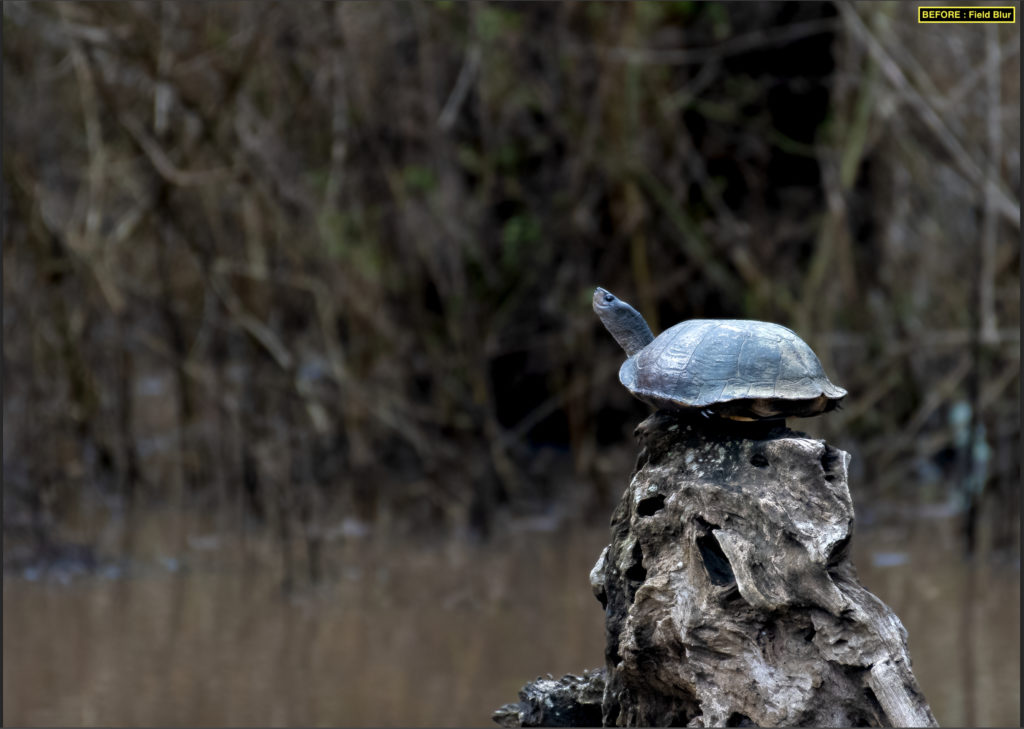
The turtle is sharp and in focus. While, in the background, the dried vegetation appears as clutter. The cluttered background is not bad but we can make this image slightly better, by using the Field blur technique.
In your image, if there is the main subject ( Here it is Turtle ) and background then you can get excellent background blur using Field blur. Field blur works best when you only have the main subject and background ( and no foreground )
Image Exif: f/5.6, 1/500 s and ISO 800
- Open the image in Adobe Photoshop
- Create a Background Copy Layer by Selecting the background layer and dragging at Create New Layer Icon ( + symbol)
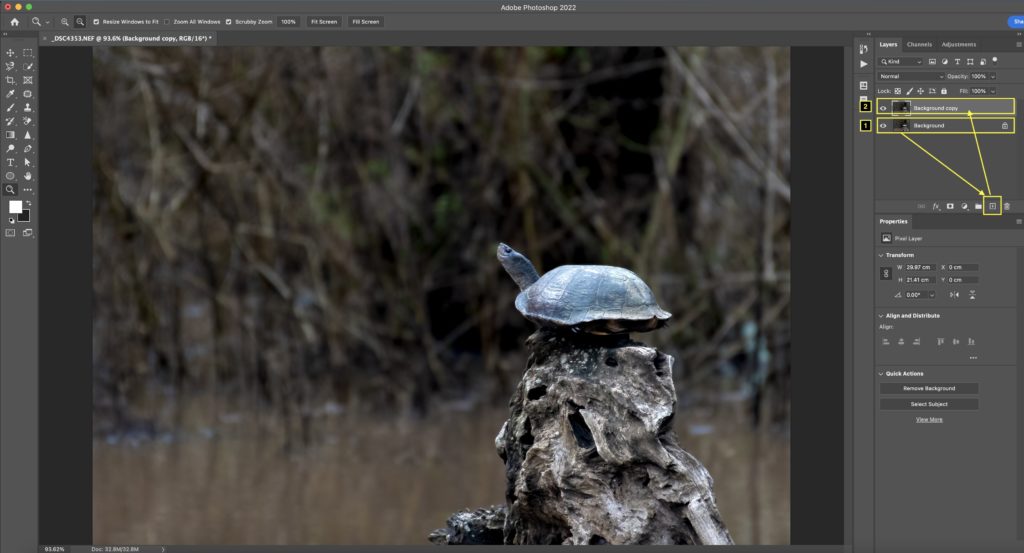
- Select a background copy layer that you just created.
- Lets go ahead and select the subject. In this image here we have a Turtle basking on dry wooden log.
- Click on Select > Subject . The Subject will be selected. ( Turtle and a dry wooden log )
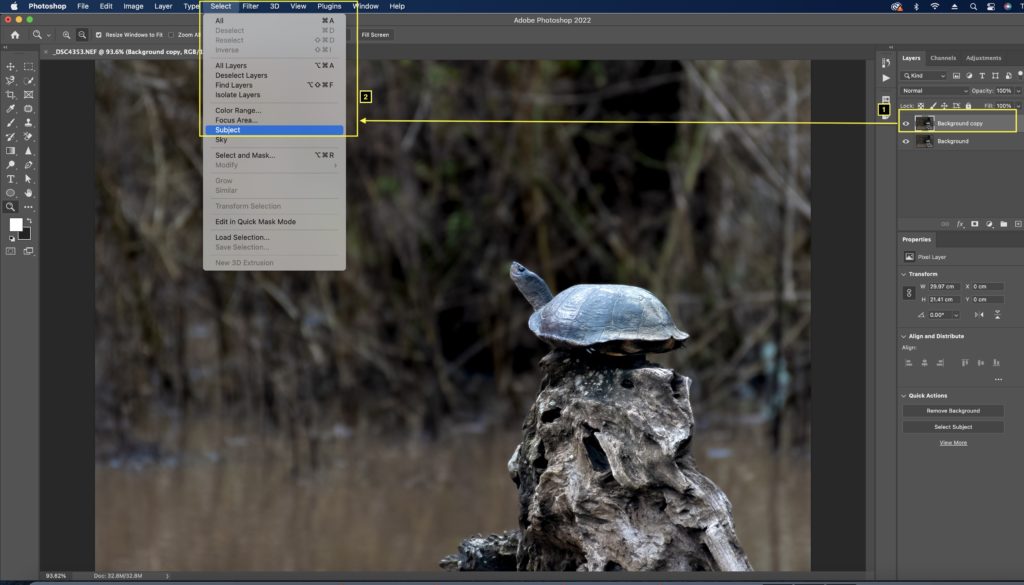
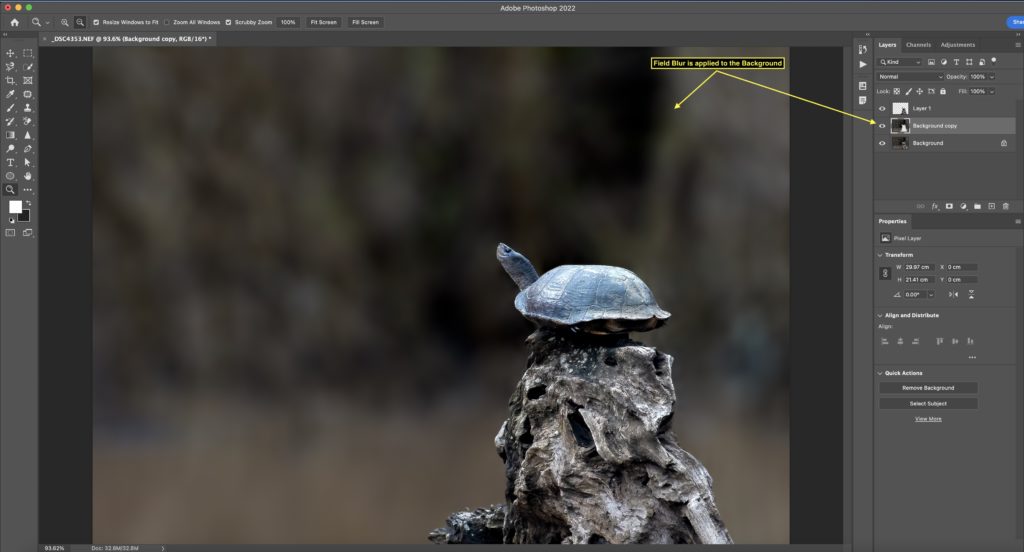
- You can see the below image, Photoshop has selected the subject in focus quite accurately.
- With the main subject selected, Click on Layer > New > Layer via Cut.
- With this option, a New layer will be created with the main subject.
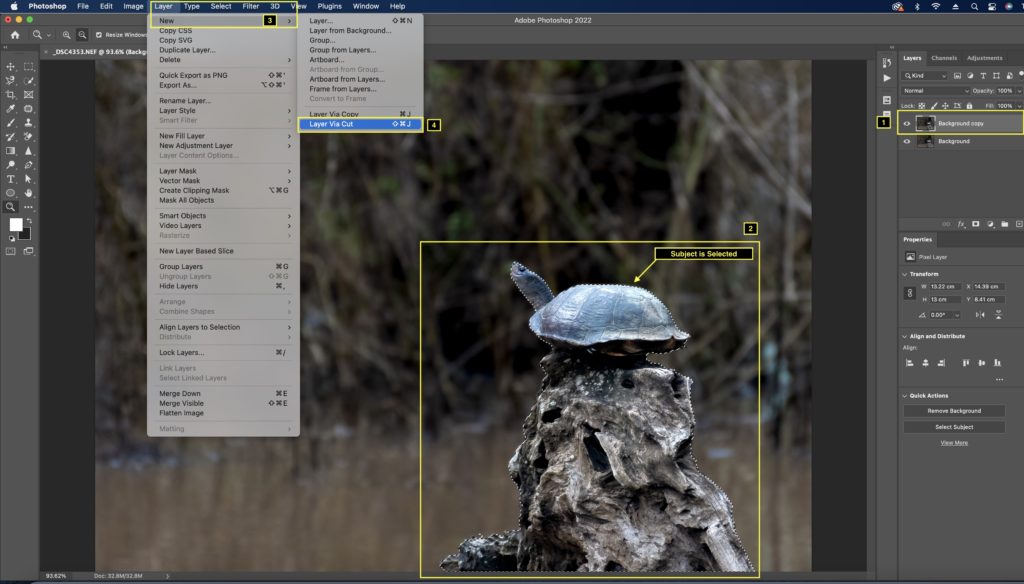
- In the below image, you can see that ‘Layer 1’ has been created.
- Layer 1 consists of the main subject that we selected earlier.
- You will notice, for the ‘Background Copy’ layer only the background Is visible. And, the main subject is not part of this layer.
- Now, it’s time to blur the background. We will apply the blur for Layer ‘Background Copy’
- For blurring the background, select Filter > Blur Gallery > Field Blur
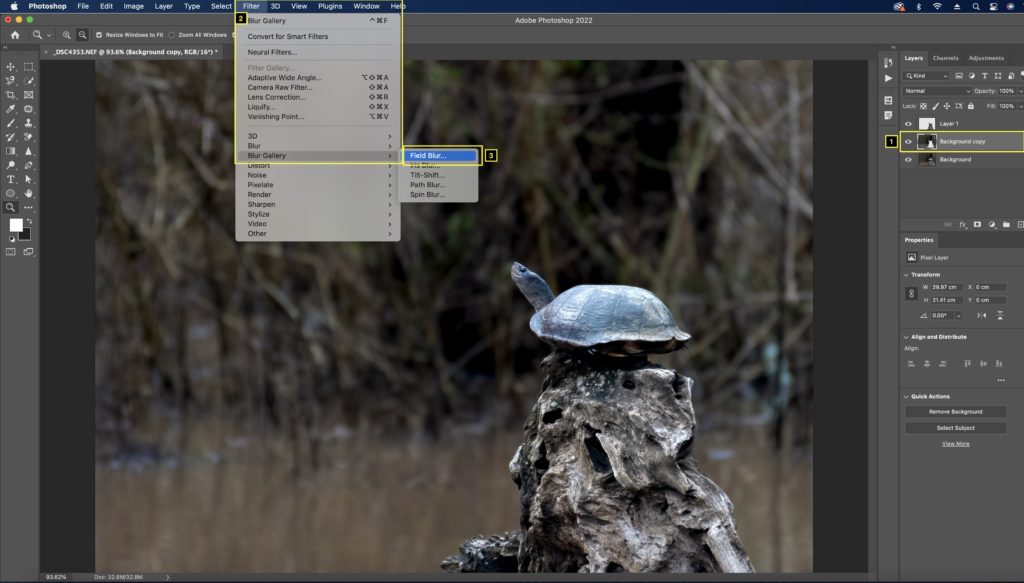
- Blur galley window will pop up.
- Select a ‘Field Blur’ option.
- Adjust the blur value as per the image requirement. Start slowly increasing the Blur value.
- I would recommend using the blur value in moderation. Our goal is to make the main subject look sharp and beautiful with subtle blur background.
- Hence, blur the background so that it looks natural and beautiful. ( Avoid over-application of the blur settings, else the image will look artificial)
- Click > Ok
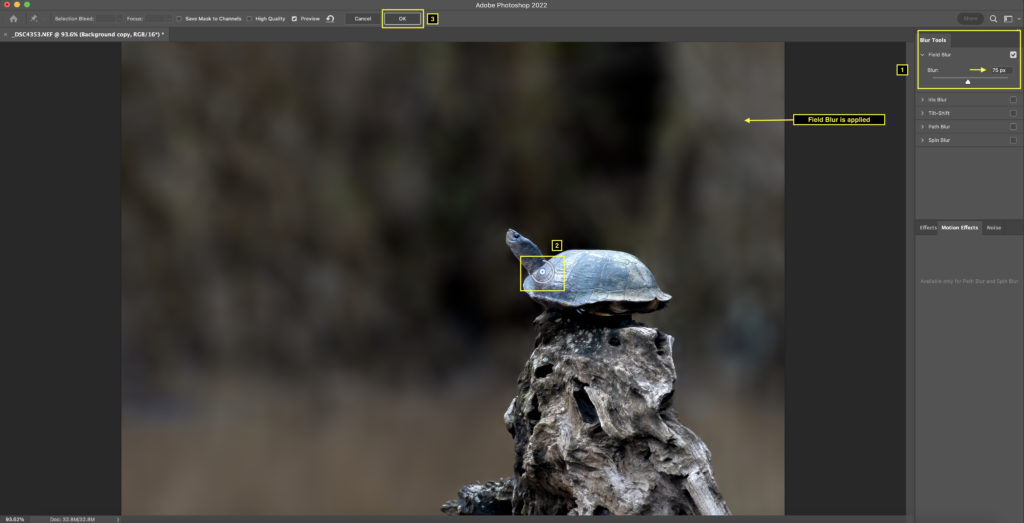
- Once you hit ok, the Background will be blurred.
- Here is an Image BEFORE applying the blur.
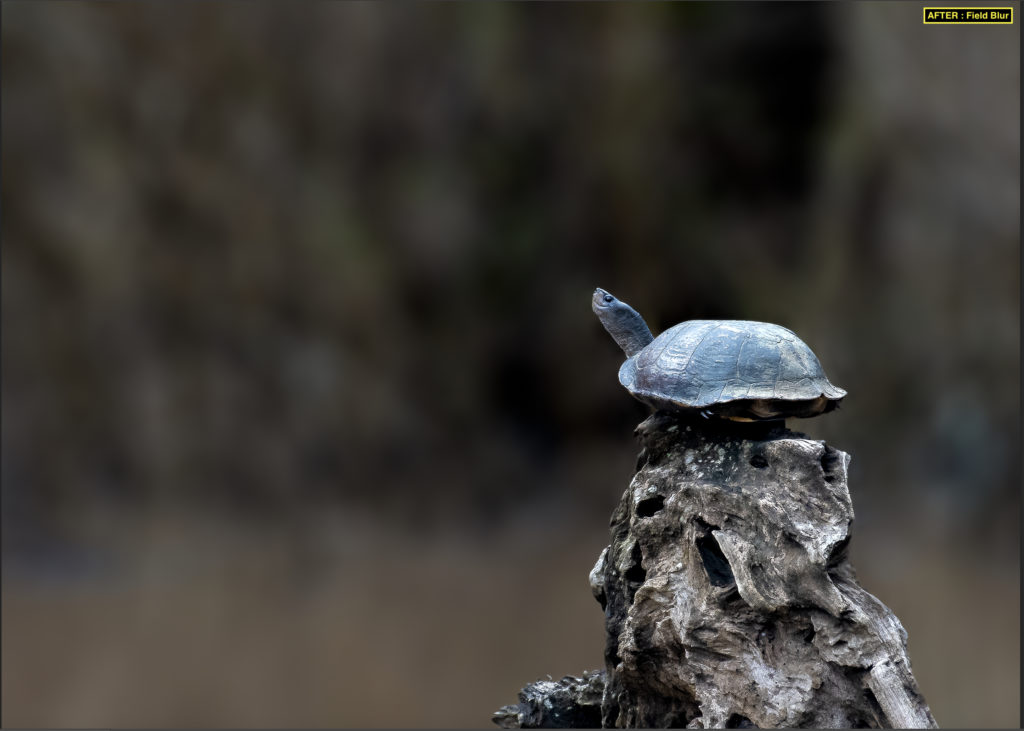
- This is the image AFTER applying the blur.
- Notice how the Turtle looks sharp against the smooth blurry background?
3. Blur the Background using Tilt-Shift Blur
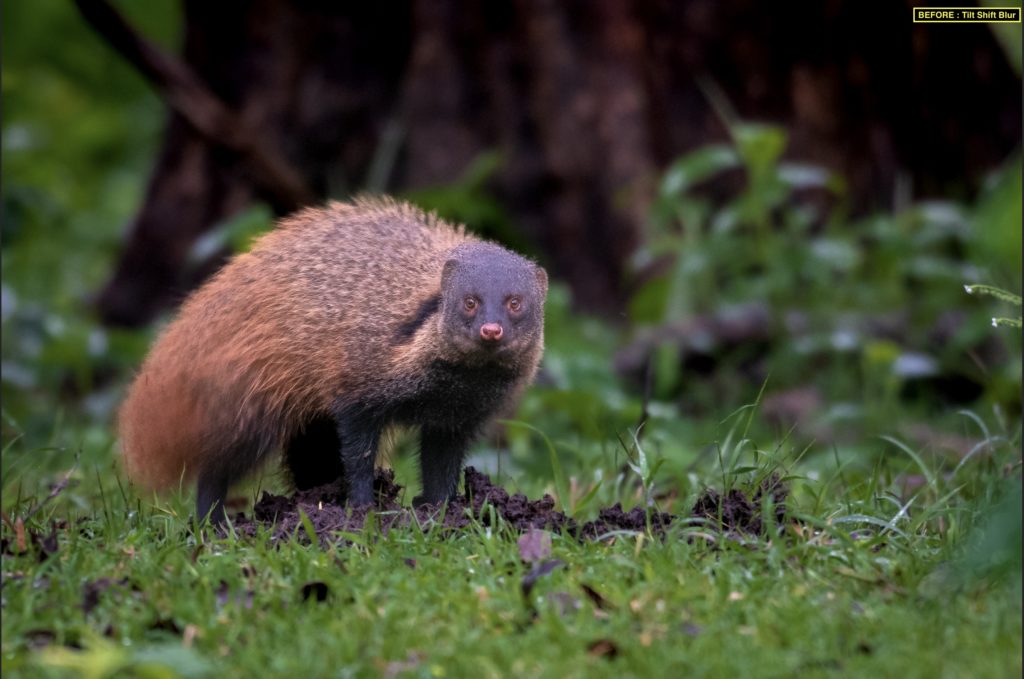
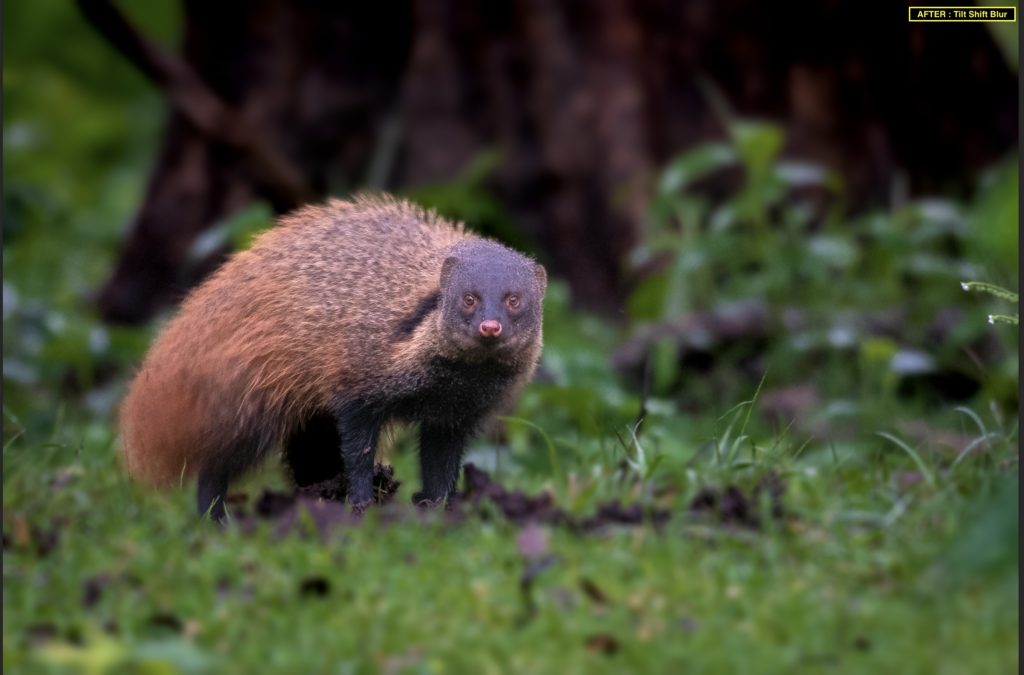
It was raining in the Kabini forest ( in Southern India ). After the rain, a pair of Stripe-necked mongoose came into an open area and started looking for food. This image is clicked while a Mongoose was digging in the soil and trying to find food.
The Mongoose is in focus. While the background and foreground are slightly blurred. However, with a minor touch of the Tilt-Shift blur option, we can make the Mongoose slightly sharp in appearance.
When you have a Foreground, main subject, and background in the image then Tilt-Shift blur is useful. In this type of image, you can clearly see the focus or blur transition between foreground, subject ( area of focus ), and background. Hence, in this type of Image use the Tilt-Shift blur option to Blur the background ( and foreground as well )
Image Exif: f/5.6, 1/40 s and ISO 800
- Open the image in Adobe Photoshop
- Create a Background Copy Layer by Selecting the background layer and dragging at Create New Layer Icon ( + symbol)
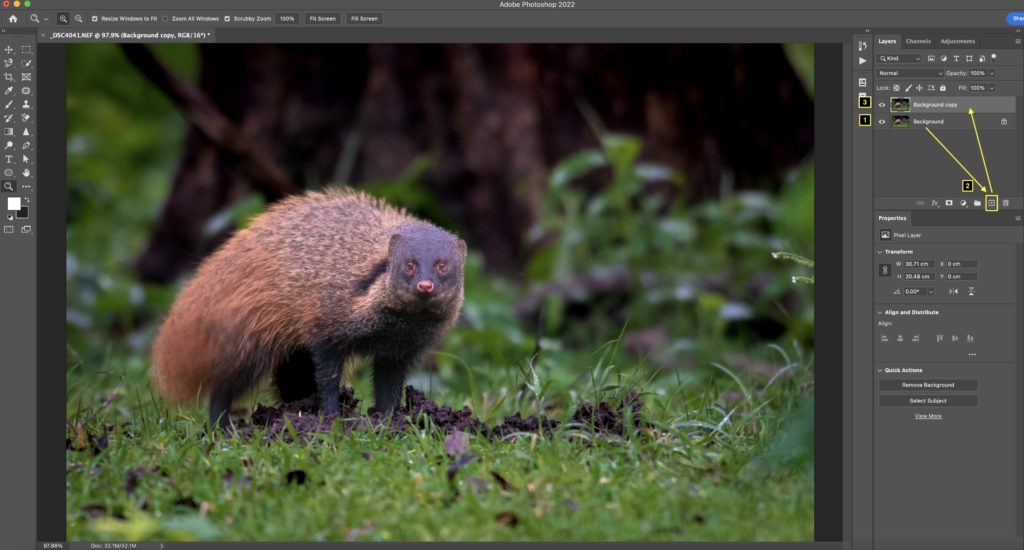
- Select a background copy layer that you just created.
- Let’s go ahead and select the subject. We have an image of Stripe necked mongoose. This Mongoose was trying to find some food under the rain-drenched soil.
- Click on Select > Subject. The Subject – Mongoose will be selected.
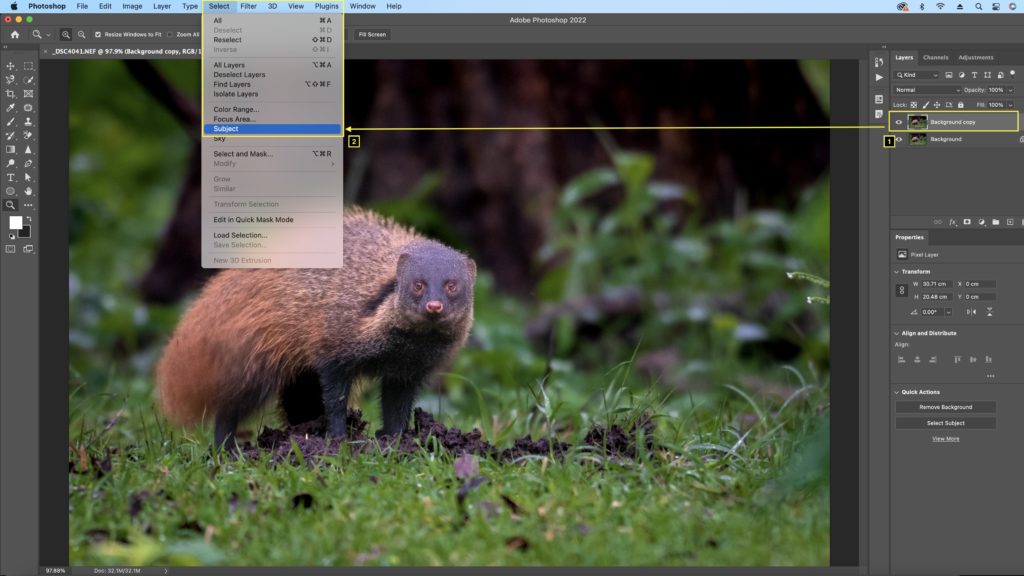
- Since there is good subject isolation from foreground and background, the subject selection is good.
- With Subject selected, under the layers panel click on > Add Layer Mask. ( Refer to below image )
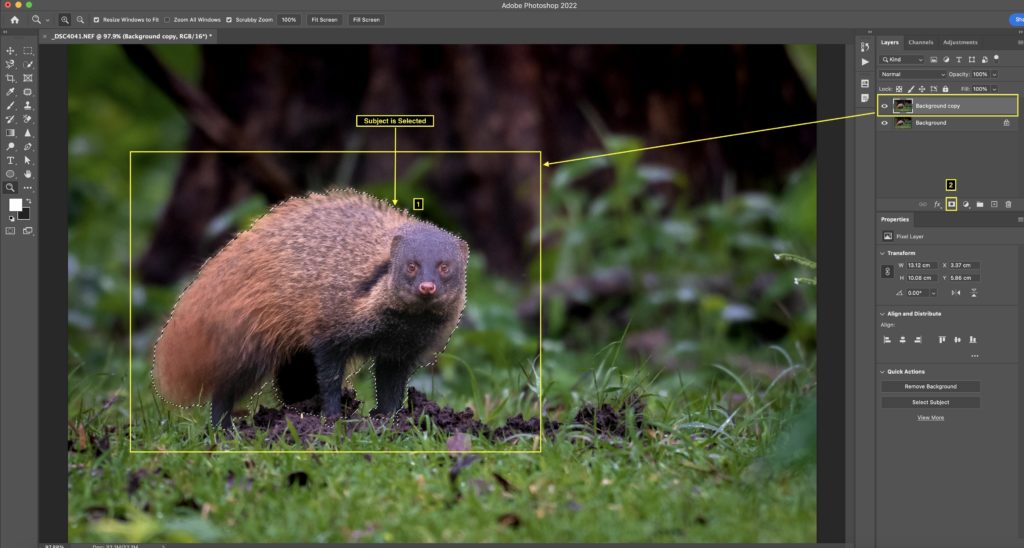
- We have now selected the Subject and created a Layer mask.
- Since we have to apply a Blur to the background we will inver the layer mask.
- To invert the layer mask, click on the layer mask you created in the earlier steps.
- Once you have selected the Layer mask click on ‘Invert ‘ ( Or you can use a shortcut key as Command/ CTRL + I )
- Refer below image to know how it is done.
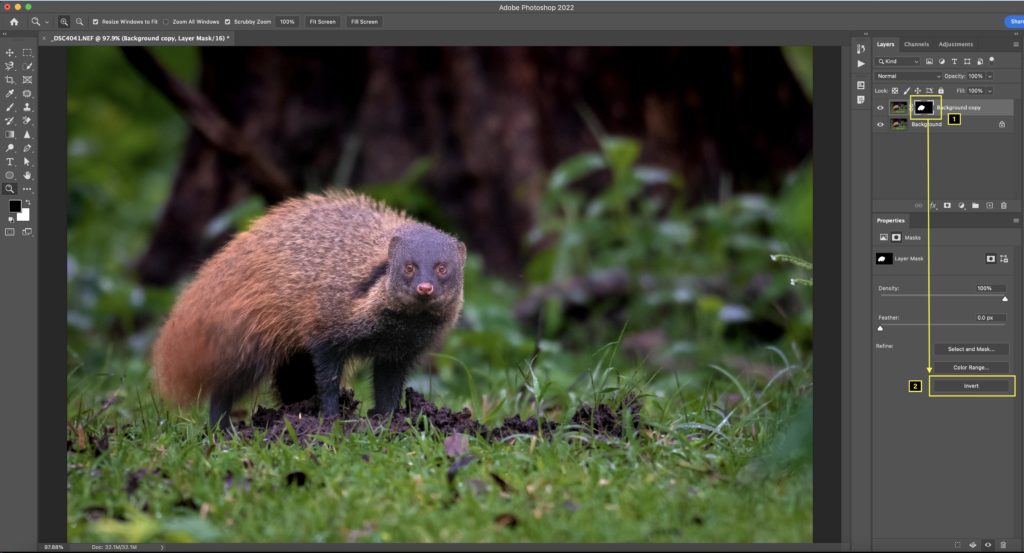
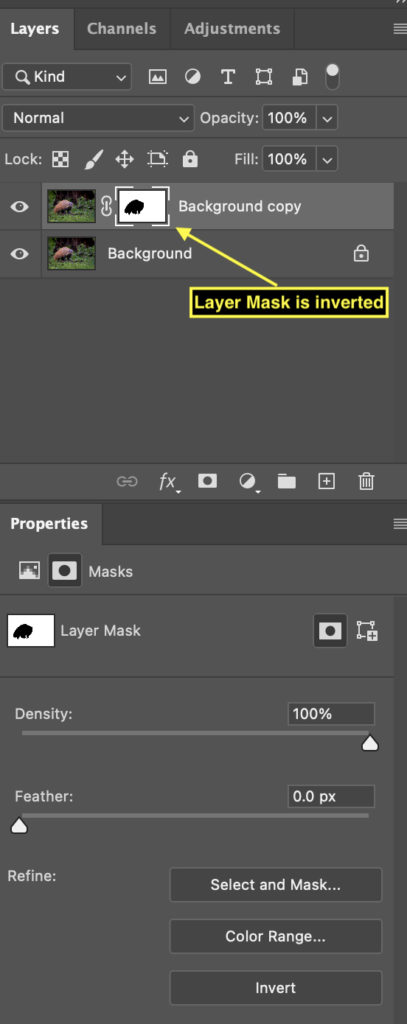
- Below is the image which shows the Background Copy layer + an Inverted Layer mask
- You will notice that the Color of the main subject ( Mongoose ) is black here.
- Other parts of the layer mask are white. Hence when we apply the blur it will be visible on the background and not on the Mongoose. ( Because it is covered with Black color in the layer mask )
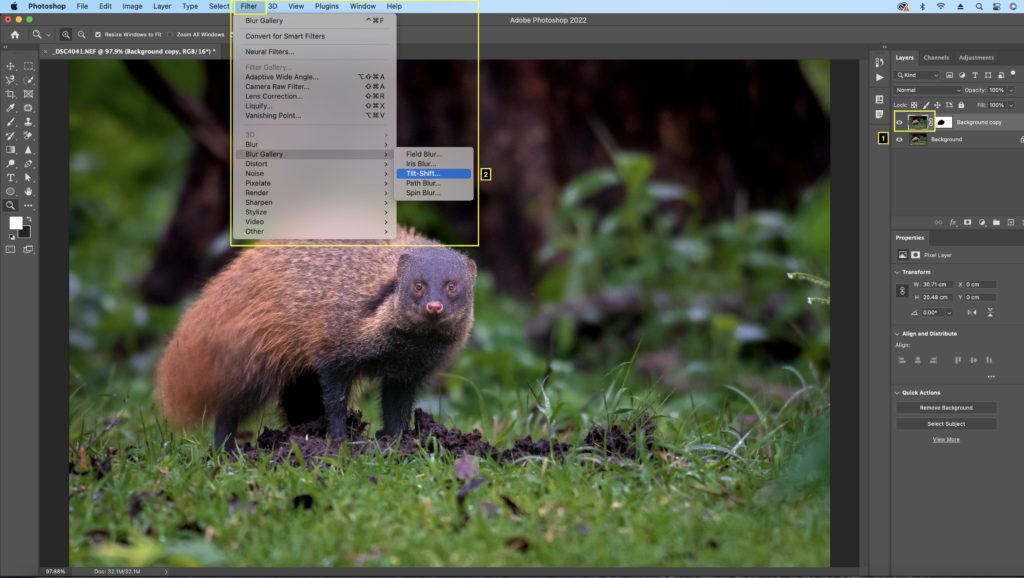
- To apply the Tilt-Shift blur, with the ‘Background Copy layer ‘selected –
- Select Filter > Blur Gallery > Tilt-Shift
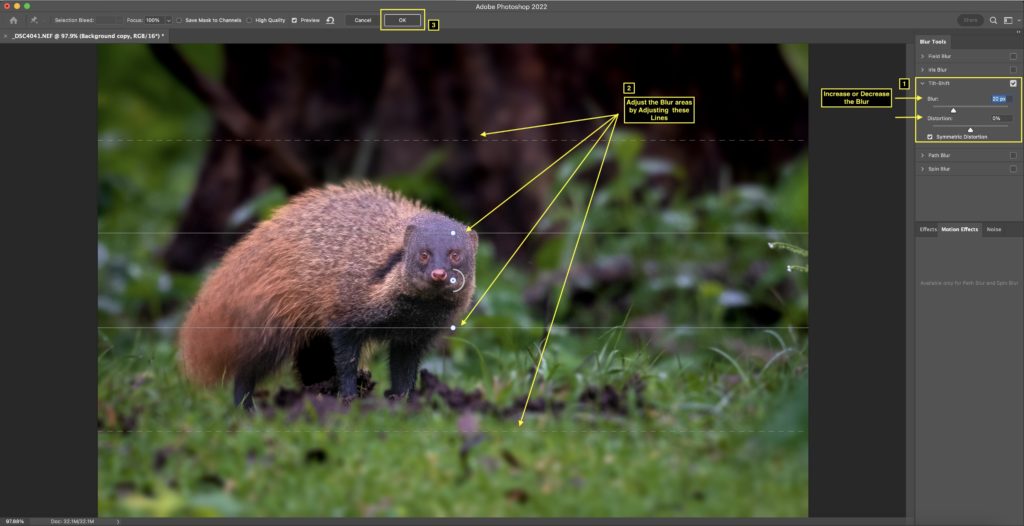
- A Blur window will appear.
- Refer to the below image.
- Increase or decrease the blur as per requirement.
- Keep the distortion to zero.
- Notice how I have placed the Tilt-Shift blur point on the face of the Mongoose. Now adjust the lines up and down to adjust the Blur area.
- Once you have applied the Blur and adjusted the blur areas then click Ok.
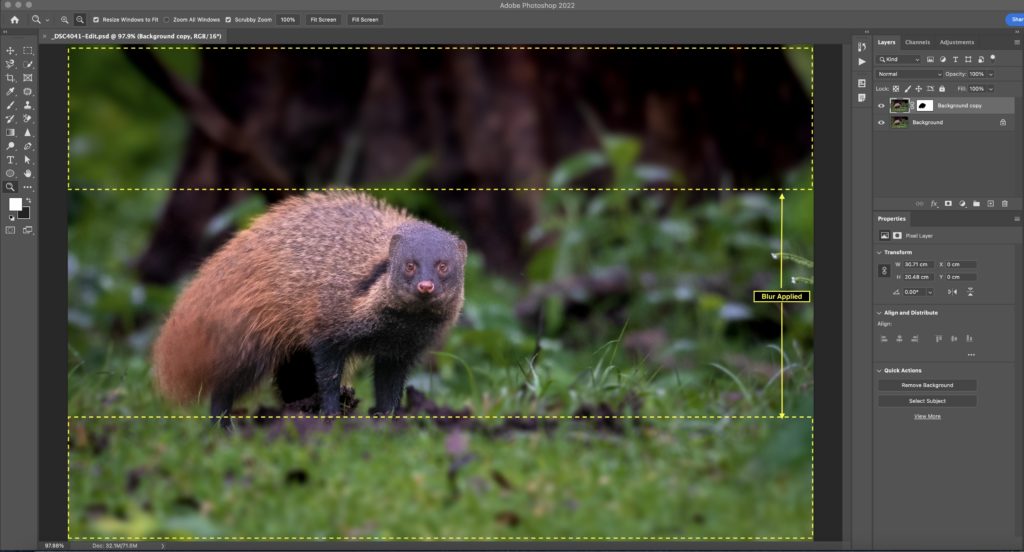
- In the below image, you can see how the Areas in the foreground and background are blurred.
- Like any other Blur technique, Moderation is key.
- Apply a Tilt-shift blur in moderation and try to set up the blur areas more realistically. ( The way the actual lens will have blur areas )
- Your image will shine with a small and sweet amount of Tilt-shift blur.
- Here is an image BEFORE applying the Tilt-Shift blur.
- This is the image of Stripe Necker Mongoose AFTER applying the Tilt-Shift blur.
- You will see that how the Mongoose pops up thru the image with foreground and background is blurred.
Here are Simple Steps to make precise selections quickly in Adobe Photoshop
Step By Step Guide # 1: Selections in Adobe Photoshop
Step By Step Guide # 2: Selections in Adobe Photoshop
Now it’s your turn!
Which of the Image Blur Techniques are you going to try first?
Is it a Lens blur, Field blur, or Tilt Shift blur? Either way, Let me know by leaving the comment below right now.
Amazing techniques discussed here. You have explained the 3 methods so nicely that I am excited to process a few images immediately!!
Thanks for sharing your idea!!
Thank you Mr. Sarajit. I am glad to know you liked the article. Yes, Good luck with this Idea !